WEBLOGIC 12C WITH FORMS AND REPORTS INSTALLATION AND CONFIGURATION ON ORACLE LINUX 8.7


====================================================================
Step-1: Software Selection while OS Installation ====================================================================

It would be advisable to click on the “Software Selection” link and pick the following options if you want a GUI console.
Base Environment > Server with GUI
Add-Ons for Selected Environment > Compatibility Libraries
Add-Ons for Selected Environment > Development Tools
Once you have completed your selections, click the “Done” button.
And left other options will be default

====================================================================
Step-2: OS Installation and Configure SeLinux ====================================================================

If the OS is to be used for an Oracle installation, it is easier if Secure Linux (SELinux) is disabled or switched to permissive. To do this edit the “/etc/selinux/config” file, making sure the SELINUX flag is set as follows.
SELINUX=permissive
If SELinux is configured after installation, the server will need a reboot for the change to take effect.
Firewall
If the OS is to be used for an Oracle installation, you will need to disable or configure the local firewall, as shown here. To disable it, do the following as the “root” user.
[root@wls12c01/]# systemctl stop firewalld
[root@wls12c01/]# systemctl disable firewalld

[root@wls12c01/]# systemctl stop firewalld.service
[root@wls12c01/]# systemctl disable firewalld.service
SSH
Make sure the SSH daemon is started using the following commands.
[root@wls12c01/]# service sshd status
[root@wls12c01/]# systemctl start sshd.service
[root@wls12c01/]# systemctl enable sshd.service

Hosts File update

The following actions should be performed by the “root” user.

Make sure the “/etc/hosts” file contains correct entries for both the “localhost” and real host names.

127.0.0.1 localhost localhost.localdomain localhost4 localhost4.localdomain4
X.X.X.X wls01.abc.com.bd wls01

For a minimal installation, but if you want a GUI desktop, log in and issue the following commands from the console to install the desktop packages and reboot.

[root@wls12c01/]# dnf update -y
[root@wls12c01]# dnf groupinstall -y “GNOME”
[root@wls12c01]# dnf install -y gdm
[root@wls12c01]# systemctl enable gdm
[root@wls12c01]# systemctl set-default graphical.target
[root@wls12c01]# reboot

====================================================================
Step-3: Run yum dependencies: ====================================================================

[root@wls12c01]# dnf install -y oracle-database-preinstall-19c
[root@wls12c01]# yum install -y oracle-database-preinstall-19c
[root@wls12c01]# yum update -y

OFFLINE:

[root@wls12c01]# curl -o oracle-database-preinstall-19c-1.0-2.el8.x86_64.rpm https://yum.oracle.com/repo/OracleLinux/OL8/appstream/x86_64/getPackage/oracle-database-preinstall-19c-1.0-2.el8.x86_64.rpm

[root@wls12c01]# yum -y localinstall oracle-database-preinstall-19c-1.0-2.el8.x86_64.rpm


dnf install -y bc
dnf install -y binutils
dnf install -y compat-libcap1
dnf install -y compat-libstdc++-33
dnf install -y dtrace-modules
dnf install -y dtrace-modules-headers
dnf install -y dtrace-modules-provider-headers
dnf install -y dtrace-utils
dnf install -y elfutils-libelf
dnf install -y elfutils-libelf-devel
dnf install -y fontconfig-devel
dnf install -y glibc
dnf install -y glibc-devel
dnf install -y ksh
dnf install -y libaio
dnf install -y libaio-devel
dnf install -y libdtrace-ctf-devel
dnf install -y libXrender
dnf install -y libXrender-devel
dnf install -y libX11
dnf install -y libXau
dnf install -y libXi
dnf install -y libXtst
dnf install -y libgcc
dnf install -y librdmacm-devel
dnf install -y libstdc++
dnf install -y libstdc++-devel
dnf install -y libxcb
dnf install -y make
dnf install -y net-tools
dnf install -y nfs-utils
dnf install -y python
dnf install -y python-configshell
dnf install -y python-rtslib
dnf install -y python-six
dnf install -y targetcli
dnf install -y smartmontools
dnf install -y sysstat
dnf install -y unixODBC
dnf install -y libnsl
dnf install -y libnsl.i686
dnf install -y libnsl2
dnf install -y libnsl2.i686


yum install binutils -y
yum install compat-libstdc++-33 -y
yum install compat-libstdc++-33.i686 -y
yum install gcc -y
yum install gcc-c++ -y
yum install glibc -y
yum install glibc.i686 -y
yum install glibc-devel -y
yum install glibc-devel.i686 -y
yum install ksh -y
yum install libgcc -y
yum install libgcc.i686 -y
yum install libstdc++ -y
yum install libstdc++.i686 -y
yum install libstdc++-devel -y
yum install libstdc++-devel.i686 -y
yum install libaio -y
yum install libaio.i686 -y
yum install libaio-devel -y
yum install libaio-devel.i686 -y
yum install libXext -y
yum install libXext.i686 -y
yum install libXtst -y
yum install libXtst.i686 -y
yum install libX11 -y
yum install libX11.i686 -y
yum install libXau -y
yum install libXau.i686 -y
yum install libxcb -y
yum install libxcb.i686 -y
yum install libXi -y
yum install libXi.i686 -y
yum install make -y
yum install sysstat -y
yum install unixODBC -y
yum install unixODBC-devel -y
yum install zlib-devel -y
yum install zlib-devel.i686 -y
yum install -y libstdc++-devel* gcc-* ksh* glibc-devel* motif-*
yum install -y binutils-* libcap-* libstdc++-* libgcc-* libstdc++-devel-* sysstat-* gcc-* gcc-c++-* ksh-* make-* glibc-* glibc-devel-* libaio-* libaio-devel-* motif-*
yum install binutils -y
yum install compat-libstdc++-33 -y

yum install compat-libstdc++-33.i686 -y

yum install gcc -y
yum install gcc-c++ -y
yum install glibc -y
yum install glibc.i686 -y
yum install glibc-devel -y
yum install glibc-devel.i686 -y
yum install ksh -y
yum install libgcc -y
yum install libgcc.i686 -y
yum install libstdc++ -y
yum install libstdc++.i686 -y
yum install libstdc++-devel -y
yum install libstdc++-devel.i686 -y
yum install libaio -y
yum install libaio.i686 -y
yum install libaio-devel -y
yum install libaio-devel.i686 -y
yum install libXext -y
yum install libXext.i686 -y
yum install libXtst -y
yum install libXtst.i686 -y
yum install libX11 -y
yum install libX11.i686 -y
yum install libXau -y
yum install libXau.i686 -y
yum install libxcb -y
yum install libxcb.i686 -y
yum install libXi -y
yum install libXi.i686 -y
yum install make -y
yum install sysstat -y
yum install unixODBC -y
yum install unixODBC-devel -y
yum install zlib-devel -y
yum install zlib-devel.i686 -y
yum install -y binutils-* libcap-* libstdc++-* libgcc-* libstdc++-devel-* sysstat-* gcc-* gcc-c++-* ksh-* make-* glibc-* glibc-devel-* libaio-* libaio-devel-* motif-*
yum install -y binutils- libcap- libstdc++- libgcc- libstdc++-devel- sysstat- gcc- gcc-c++- ksh- make- glibc- glibc-devel- libaio- libaio-devel- motif-*

====================================================================
Step-4: User/Group create/add and necessary directory creation: ====================================================================

[root@wls12c01]# groupadd -g 54321 oinstall
[root@wls12c01]# useradd -u 54321 -g oinstall oracle
[root@wls12c01]# passwd oracle

Create the directories in which the Oracle software will be installed.

[root@wls12c01]# mkdir -p /u01/app/oracle/product/12.2.1.4
[root@wls12c01]# mkdir -p /u01/app/oracle/config/domains
[root@wls12c01]# mkdir -p /u01/app/oracle/config/applications
[root@wls12c01]# chown -R oracle:oinstall /u01
[root@wls12c01]# chmod -R 775 /u01/

====================================================================
Step-5: JDK, Patches and software download: ====================================================================

Jdk: 8u144 jdk-8u291-linux-x64.tar.gz
Patchset: p31190532_122140_Generic.zip
Forms_Reports: fmw_12.2.1.4.0_fr_linux64.bin
Forms_Reports_Zip: fmw_12.2.1.4.0_fr_linux64-2.zip
WLS_Infrastructure: fmw_12.2.1.4.0_infrastructure.jar

====================================================================
Step-6: Installing SDK ====================================================================

Uninstall default Openjdk from oracle linux

[root@wls12c01 ~]# yum remove -y java-1.8.0-openjdk-headless-1.8.0.382.b05-2.0.1.el8.x86_64
[root@wls12c01 ~]# su oracle
[oracle@wls12c01 ~]# cd /u01/soft
[oracle@wls12c01 soft]# tar -xvzf jdk-8u291-linux-x64.tar.gz
[oracle@wls12c01 soft]# mv jdk1.8.0_291 jdk1.8
[oracle@wls12c01 soft]# mv jdk1.8 /u01/ jdk1.8

====================================================================
Step-7: Bash Profile edit and permanent: ====================================================================

[oracle@wls12c01 ~]# vi .bash_profile

#.bash_profile

#Get the aliases and functions

if [ -f ~/.bashrc ]; then
. ~/.bashrc
fi
export ORACLE_BASE=/u01/app/oracle
export ORACLE_HOME=$ORACLE_BASE/middleware/product/12.2.1.4
export WLS_HOME=$ORACLE_HOME/wlserver
export WL_HOME=$WLS_HOME
export FR_HOME=$ORACLE_HOME
export DOMAIN_HOME=$ORACLE_HOME/user_projects/domains/wls01_domain
export ORACLE_INSTANCE=$DOMAIN_HOME/config/fmwconfig/components/FORMS/forms1
export FR_INST=$ORACLE_INSTANCE
export JAVA_HOME=/u01/jdk1.8
export OHS_INST=$DOMAIN_HOME/config/fmwconfig/components/OHS/ohs1
export WEBUTIL_CONFIG=/u01/app/oracle/config/domains/frsdomain/config/fmwconfig/components/FORMS/instances/forms1/server/webutil.cfg

export FORMS_PATH=[*** add the path to your forms ***]

export REPORTS_PATH=/u01/ababil/reports
export TNS_ADMIN=$DOMAIN_HOME/config/fmwconfig/

export TNS_ADMIN=/u01/app/oracle/

export TERM=vt220
export ORACLE_TERM=$TERM

export COMPONENT_CONFIG_PATH=$DOMAIN_HOME/config/fmwconfig/components/ReportsToolsComponent/reptools1

Reports server: Adjust as required to allow forms to get the reports server name

using “tool_env.getvar(‘REPORTS_SERVER_NAME’, v_rep_server);”

export REPORTS_SERVER_NAME=rep_wls_reports_ol6-forms_asinst_1

PATH=$PATH:$ORACLE_HOME/bin:$JAVA_HOME/bin:$FR_HOME\forms\webutil:$FR_HOME\forms\lib
export FORMS_PATH=/u01/ababil/AIBLFORMS/Forms:$ORACLE_HOME/forms; export PATH

User specific environment and startup programs

Permanent the changes
[oracle@wls12c01 ~]# . ./.bash_profile

====================================================================
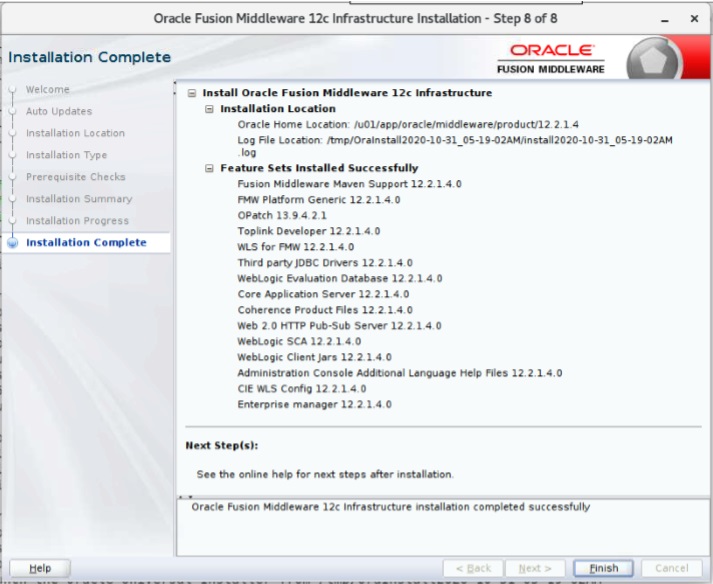
Step-8: Infrastructure Installation ====================================================================

Run the installer as the “oracle” user.

[oracle@wls12c01 soft] unzip fmw_12.2.1.2.0_infrastructure_Disk1_1of1.zip
[oracle@wls12c01 soft] ls
fmw_12.2.1.2.0_infrastructure.jar
[oracle@wls12c01 soft] $JAVA_HOME/bin/java -jar fmw_12.2.1.2.0_infrastructure.jar

====================================================================
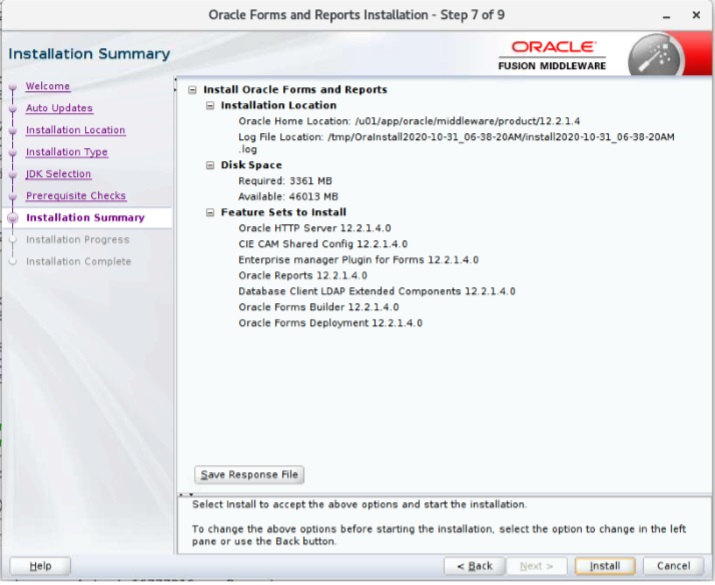
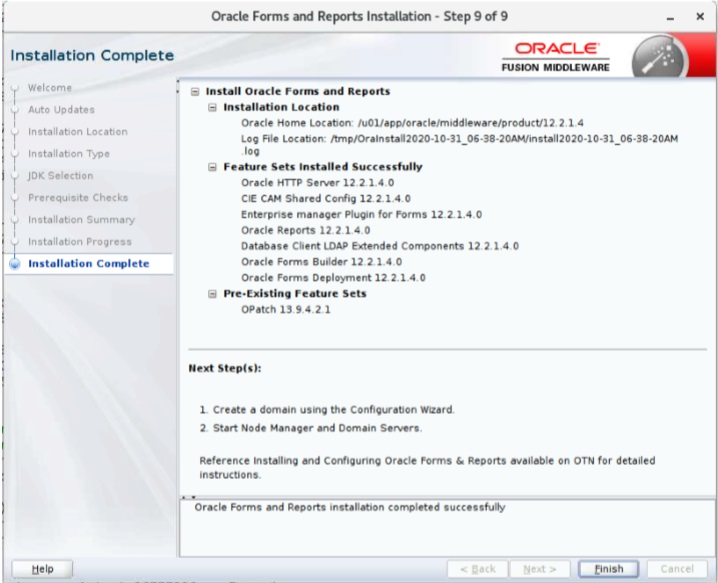
Step-9: Forms and Reports installation ====================================================================

Unzipping the “fmw_12.2.1.2.0_fr_linux64_Disk1_1of1.zip” file produces an executable “.bin” file, which starts the installer.

[oracle@wls12c02 soft]# unzip fmw_12.2.1.2.0_fr_linux64_Disk1_1of1.zip
[oracle@wls12c02 soft]# ls
fmw_12.2.1.2.0_fr_linux64.bin
[oracle@wls12c02 soft] unzip p31190532_122140_Generic.zip
[oracle@wls12c02 soft]ls
31190532
[oracle@wls12c02 soft]# ./fmw_12.2.1.4.0_fr_linux64.bin -prereqConfigLoc /u01/soft/31190532/prereq_metadata/oracle.as.install.fr.prerequisite/prereq

====================================================================
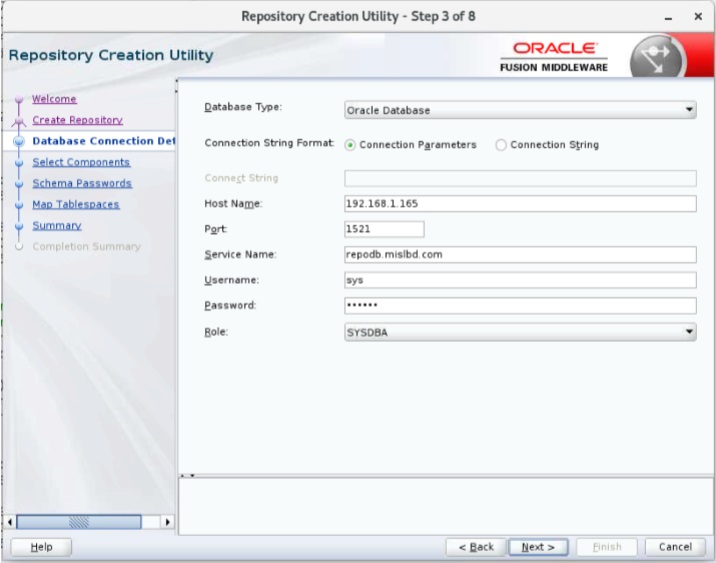
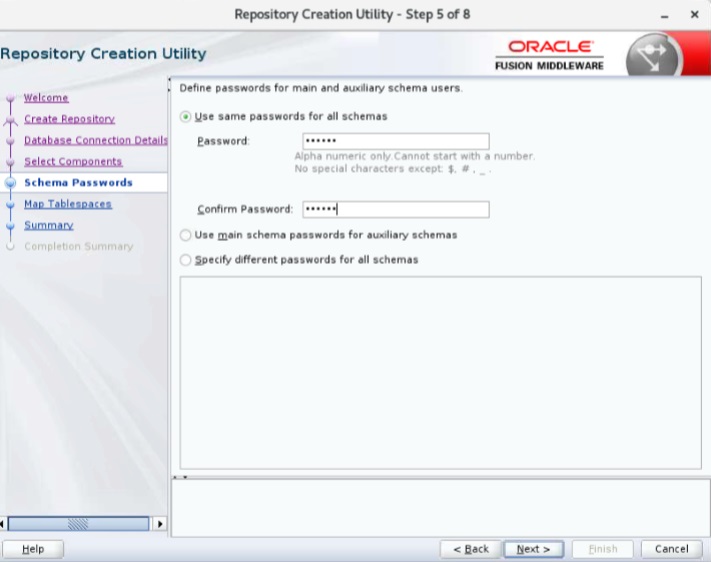
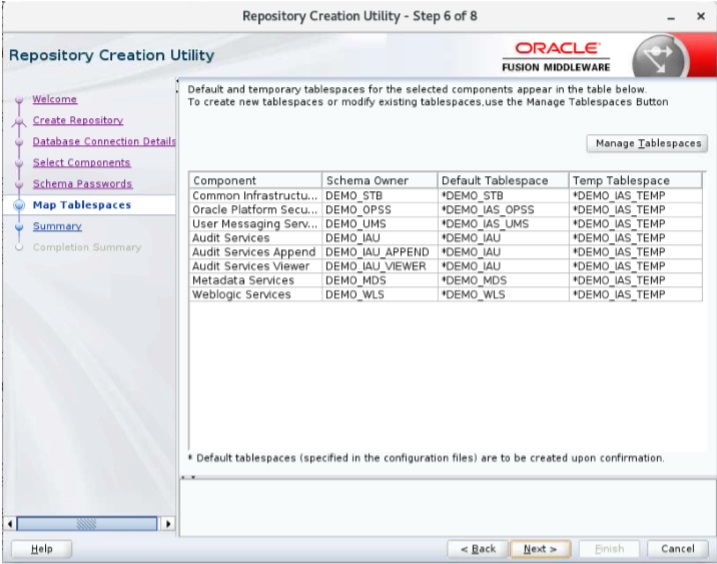
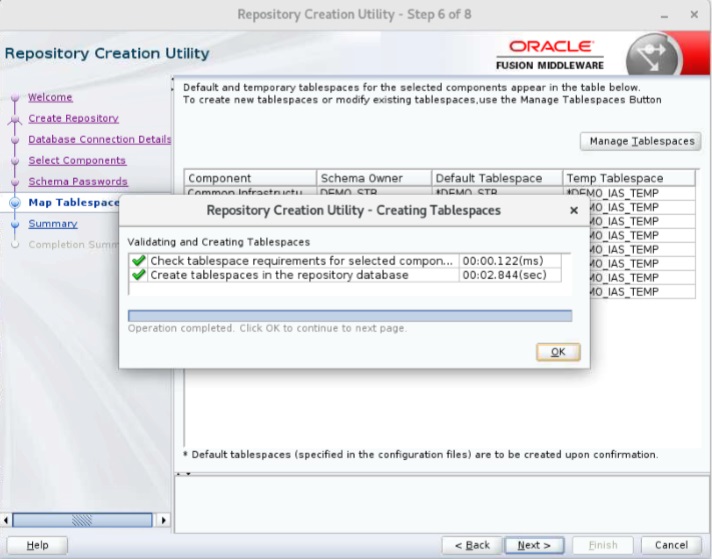
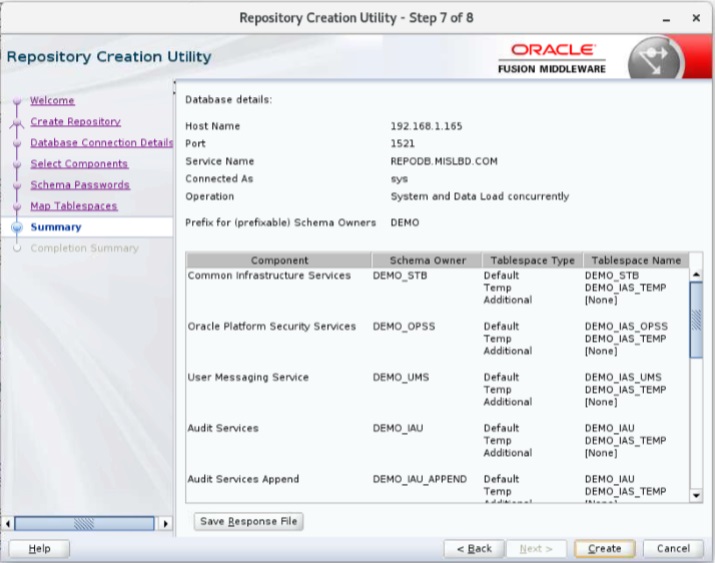
Step-10: RCU Setup ====================================================================

[oracle@wls12c01aibl ~]$ cd $ORACLE_HOME/
[oracle@wls12c01aibl 12.2.1.4]$ cd oracle_common/bin/
[oracle@wls12c01aibl bin]$ pwd
/u01/app/oracle/middleware/product/12.2.1.4/oracle_common/bin
[oracle@wls12c01aibl bin]$ sh rcu

====================================================================
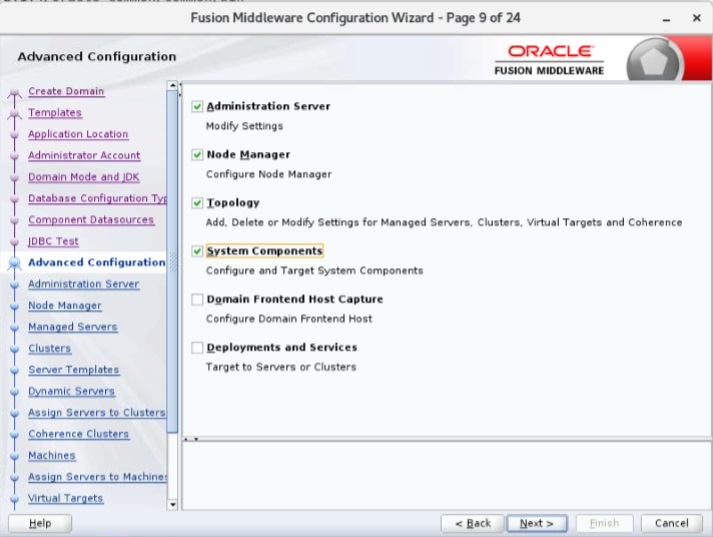
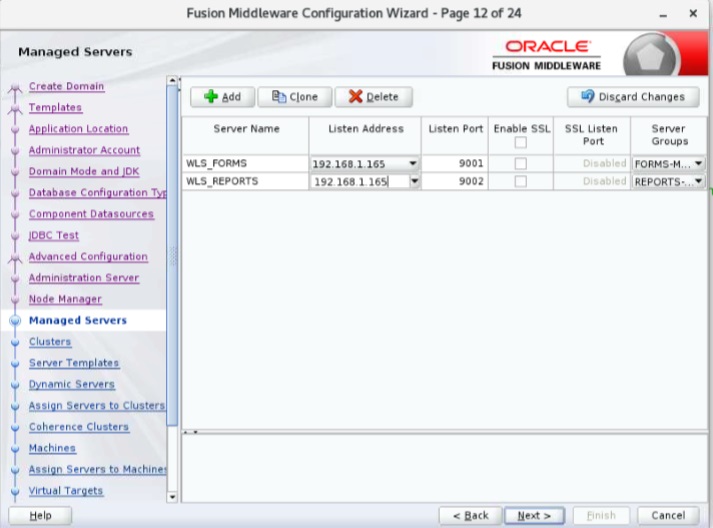
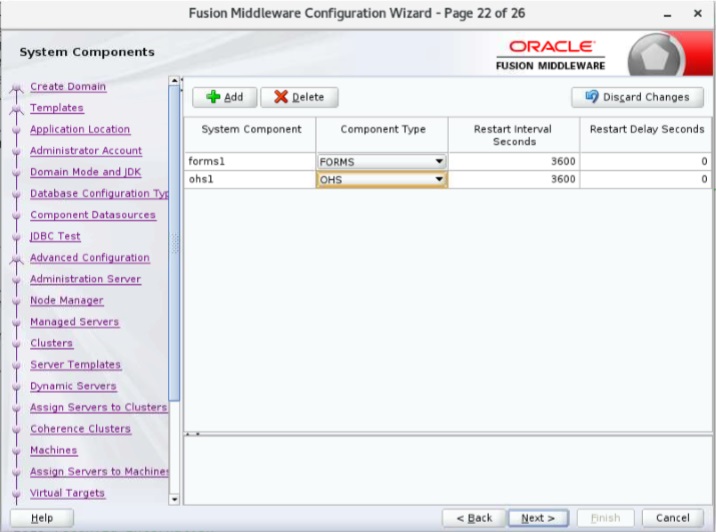
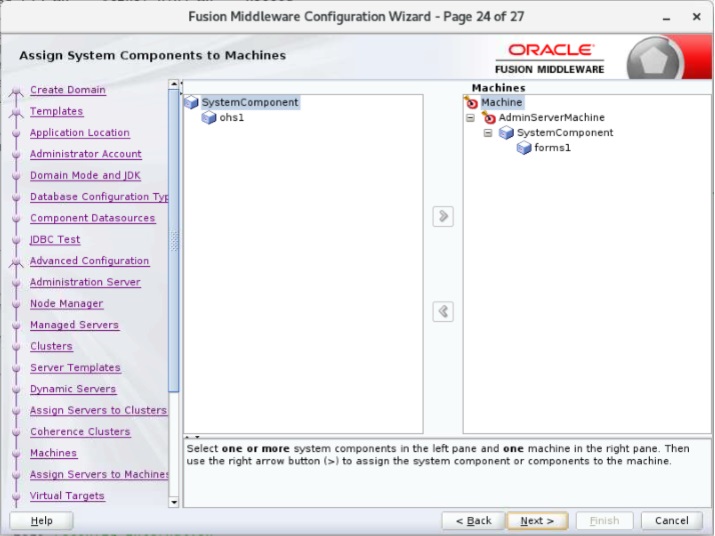
Step-11: Create Domain ====================================================================

Launch the Configuration Wizard with the following command.

$ORACLE_HOME/oracle_common/common/bin /config.sh

Accept the “Create a new domain” option, enter the domain name at the end of the “Domain Location“, then click the “Next” button.
In this case my domain was called “frsdomain”, so the path I used was “/u01/app/oracle/config/domains/frsdomain”.

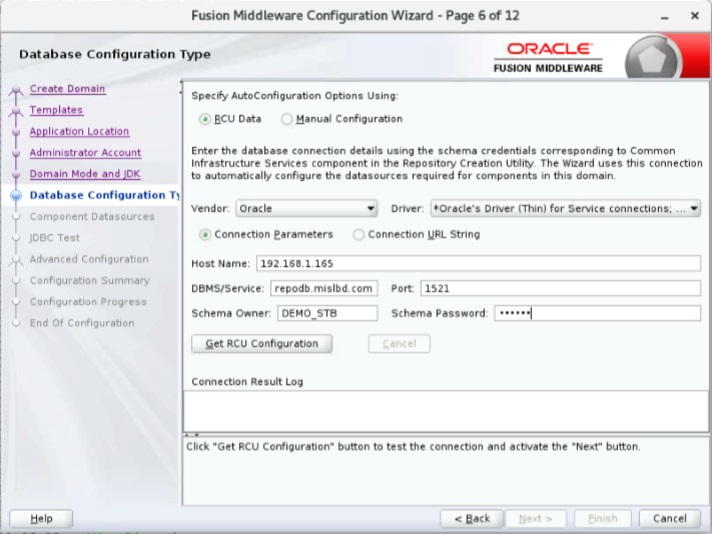
Get RCU Configuration ..

Admin Host: leave it blank

====================================================================
Step-12: Disable database derby service: ====================================================================

[oracle@wls01 ~]$ cd $ORACLE_HOME/wlserver/common/derby/lib/
[oracle@wls01 ~]$ ls
[oracle@wls01 ~]$ mv derby.jar disable_derby.jar

==================================================================== Step-13: Start Weblogic: ====================================================================

[oracle@wls01 ~]$ /u01/app/oracle/user_projects/domains/wls01_domain/bin

[oracle@wls01 ~]$ ./startWebLogic.sh

Enter username to boot WebLogic server:weblogic
Enter password to boot WebLogic server:weblogic123

Go to a duplicate tab:

[oracle@wls01 ~]$ /u01/app/oracle/user_projects/domains/wls01_domain/bin

[oracle@wls01 ~]$ ./stopWeblogic.sh

Note: To use the “&” if you want access to the command line to be returned.

[oracle@wls01 ~]$ $DOMAIN_HOME/startWebLogic.sh &

Once the server is started you can access the administrator console using thehttp://hostname:port/console” URL.

=================================================================== Step-14: Create the boot properties: ===================================================================

[oracle@wls01 ~]$ export DOMAIN_HOME=$ORACLE_BASE/config/domains/frsdomain
[oracle@wls01 ~]$ mkdir -p $DOMAIN_HOME/servers/AdminServer/security
[oracle@wls01 ~]$ echo “username=weblogic” > $DOMAIN_HOME/servers/AdminServer/security/boot.properties
[oracle@wls01 ~]$ echo “password=Password1” >> $DOMAIN_HOME/servers/AdminServer/security/boot.properties

OR

[oracle@wls01 ~]$ echo -e “username=weblogic\npassword=weblogic123” > boot.properties

[oracle@wls01 ~]$ cat boot.properties

[oracle@wls01 ~]$ mkdir -p $DOMAIN_HOME/servers/WLS_FORMS/security
[oracle@wls01 ~]$ cp $DOMAIN_HOME/servers/AdminServer/security/boot.properties

[oracle@wls01 ~]$ $DOMAIN_HOME/servers/WLS_FORMS/security/boot.properties
[oracle@wls01 ~]$ mkdir -p $DOMAIN_HOME/servers/WLS_REPORTS/security
[oracle@wls01 ~]$ cp $DOMAIN_HOME/servers/AdminServer/security/boot.properties

[oracle@wls01 ~]$ $DOMAIN_HOME/servers/WLS_REPORTS/security/boot.properties

=================================================================== Step-15: Node Manager Configuration: ===================================================================

[oracle@wls01 ~]$ cd /u01/app/oracle/user_projects/domains/wls01_domain/nodemanager

[oracle@wls01 ~]$ vi nodemanager.properties

Change the parameter:

CrashRecoveryEnabled=false
to,
CrashRecoveryEnabled=true

Start Nodemanager:

[oracle@wls01 ~]$ cd /u01/app/oracle/user_projects/domains/wls01_domain/bin

[oracle@wls01 ~]$ nohup ./startNodeManager.sh &

=================================================================== Step-16: Start AdminServer via NodeManager and WLST ===================================================================

[oracle@wls12c01/]$ sh $ORACLE_HOME/oracle_common/common/bin/wlst.sh

Initializing WebLogic Scripting Tool (WLST) …

Welcome to WebLogic Server Administration Scripting Shell

Type help() for help on available commands

wls:/offline>

wls:/offline> nmConnect(‘weblogic’,’weblogic123′,’t3://172.17.1.10:7001′,’5556′,’wls01_domain’,’/u01/app/oracle/user_projects/domains/wls01_domain’)

wls:/offline> nmStart(‘AdminServer’)

=================================================================== Step-17: Report Server Configuration: ===================================================================

[oracle@wls12c01/]$ sh $ORACLE_HOME/oracle_common/common/bin/wlst.sh

Initializing WebLogic Scripting Tool (WLST) …

Welcome to WebLogic Server Administration Scripting Shell

Type help() for help on available commands

wls:/offline>

Note: Connect to Adminserver => The AdminServer and WLS_REPORTS must be running

wlst> connect(‘weblogic’,’weblogic123′, ‘t3://172.17.1.10:7001’)

Create report server instance:

wls:/forms_domain/serverConfig/> createReportsToolsInstance(instanceName=’wls12c01_svr01′,machine=’AdminServerMachine’)

Go to a new tab:

Enable Reports Webaccess:

[oracle@wls01 ~]$ vi /u01/app/oracle/middleware/product/12.2.1.4/user_projects/domains/wls01_domain/config/fmwconfig/servers/WLS_REPORTS/applications/reports_12.2.1/configuration/rwservlet.properties

Add the following line:

<webcommandaccess>L2</webcommandaccess>

Restart WLS_REPORTS from the Adminserver

Create the stand alone reports server: aibl_reports

cd /u01/app/oracle/middleware/product/12.2.1.4/oracle_common/common/bin/

[oracle@wls01 ~]$ sh wlst.sh

Connect to the AdminServer (the AdminServer and WLS_REPORTS must be running):

wlst> connect(‘weblogic’,’weblogic123′, ‘t3://172.17.1.10:7001’)

Create ReportsServerInstance:

wls:/forms_domain/serverConfig/> createReportsServerInstance(instanceName=’aibl_reports’,machine=’AdminServerMachine’) (ReportServerInstance)

Go to a new tab:

Disable the Single Sign On for the Reports Server:

Edit the rwserver.properties:

[oracle@wls01 ~]$ vi /u01/app/oracle/middleware/product/12.2.1.4/user_projects/domains/base_domain/config/fmwconfig/components/ReportsServerComponent/aibl/rwserver.conf

Change the Line:

to, edit the report component rwserver.configuration

[oracle@wls01 ~]$ vi /u01/app/oracle/middleware/product/12.2.1.4/user_projects/domains/wls01_domain/config/fmwconfig/components/ReportsServerComponent/aibl_reports/rwserver.conf

Change the report server Path:
Example:

Start the standalone reports server and save the NodeManager Password:

[oracle@wls01 ~]$ cd /u01/app/oracle/middleware/product/12.2.1.4/user_projects/domains/wls01_domain/bin

[oracle@wls01 ~]$ ./startComponent.sh aibl_reports storeUserConfig

Please enter Node Manager password: xxx

Successfully Connected to Node Manager.
Starting server my_repsrv …
Successfully started server my_repsrv …
Successfully disconnected from Node Manager.

Visit link in the browser:

http://172.17.1.10:9002/reports/rwservlet/showenv?server=aibl_reports

=================================================================== Step-18: Configuring Forms and Reports for the using HTTP Server ===================================================================

Start OHS via NodeManager and WLST:

[oracle@wls01 ~]$ cd /u01/app/oracle/middleware/product/12.2.1.4/oracle_common/common/bin/

./wlst.sh

Connect to NodeManager:

wlst> nmConnect(‘weblogic’,’weblogic123′,’172.17.1.10′,’5556′,’wls01_domain’,’/u01/app/oracle/middleware/product/12.2.1.4/user_projects/domains/wls01_domain’)

Start OHS Component:

wls:/nm/forms_domain> nmStart(serverName=’ohs1′, serverType=’OHS’)

Output:

Starting server ohs1 …
Successfully started server ohs1 …

Edit the Forms Configuration: the forms.conf file:

[oracle@wls01 ~]$ cd /u01/app/oracle/middleware/product/12.2.1.4/forms/templates/config/

[oracle@wls01 ~]$ vi forms.conf

Edit Reports Configuration: the reports_ohs.conf file: In a new tab

[oracle@wls01 ~]$ cd /u01/app/oracle/middleware/product/12.2.1.4/reports/conf

[oracle@wls01 ~]$ vi reports_ohs.conf

Copy forms.conf and reports_ohs.conf to the directory OHS_INSTANCE_HOME/moduleconf:

[oracle@wls01 ~]$ cp /u01/app/oracle/middleware/product/12.2.1.4/forms/templates/config/forms.conf /u01/app/oracle/middleware/product/12.2.1.4/user_projects/domains/wls01_domain/config/fmwconfig/components/OHS/instances/ohs1/moduleconf/


SetHandler weblogic-handler
WebLogicHost 172.17.1.10
WeblogicPort 9001

[oracle@wls01 ~]$ cp /u01/app/oracle/middleware/product/12.2.1.4/reports/conf/reports_ohs.conf /u01/app/oracle/middleware/product/12.2.1.4/user_projects/domains/wls01_domain/config/fmwconfig/components/OHS/instances/ohs1/moduleconf/

mod_weblogic related entry

SetHandler weblogic-handler WebLogicHost 172.17.1.10 WebLogicPort 9002
Restart OHS Server Component:

[oracle@wls01 ~]$ cd /u01/app/oracle/middleware/product/12.2.1.4/oracle_common/common/bin/

/.wlst.sh

wlst> nmConnect(‘weblogic’,’weblogic123′,’172.17.1.10′,’5556′,’wls01_domain’,’/home/u01/app/oracle/middleware/product/12.2.1.4/user_projects/domains/wls01_domain’)

wls:/nm/forms_domain> nmKill(serverName=’ohs1′, serverType=’OHS’)

wls:/nm/forms_domain> nmStart(serverName=’ohs1′, serverType=’OHS’)

=================================================================== Step-19: Check Installation: ===================================================================

http://172.17.27.40:7001/console

http://172.17.27.40:7001/em

http://172.17.27.40:7777

http://172.17.27.40:9001/forms/frmservlet

http://172.17.27.40:7777/forms/frmservlet

http://172.17.27.40:9002/reports/rwservlet

http://172.17.27.40:7777/reports/rwservlet

http://172.17.27.40:9002/reports/rwservlet/showenv?server=aibl_reports

http://172.17.27.40:7777/reports/rwservlet/showenv?server=aibl_reports

=================================================================== Step-20: Change on FORMSWEB.CFG AND TNSNAMES.ORA FILES: formsweb.cfg ===================================================================

[oracle@wls01 ~]$ cd /u01/app/oracle/middleware/product/12.2.1.4/user_projects/domains/wls01_domain/config/fmwconfig/servers/WLS_FORMS/applications/formsapp_12.2.1/config
[oracle@wls01 ~]$ cd /u01/app/oracle/middleware/product/12.2.1.4/user_projects/domains/wls01_domain/config/fmwconfig/servers/WLS_FORMS/applications/formsapp_12.2.1/config

tnsnames.ora:

[oracle@wls01 ~]$ cd /u01/app/oracle/middleware/product/12.2.1.4/user_projects/domains/wls01_domain/config/fmwconfig/

default.env:

[oracle@wls01 ~]$ cd /u01/app/oracle/middleware/product/12.2.1.4/user_projects/domains/wls02_domain/config/fmwconfig/servers/WLS_FORMS/applications/formsapp_12.2.1/config/

[oracle@wls01 ~]$ cd /u01/app/oracle/middleware/product/12.2.1.4/user_projects/domains/wls01_domain/config/fmwconfig/servers/WLS_REPORTS/applications/reports_12.2.1/configuration/

cd /u01/app/oracle/middleware/product/12.2.1.4/user_projects/domains/wls01_domain/config/fmwconfig/components/ReportsServerComponent/aibl_reports

[oracle@wls01 ~]$ vi rwserver.conf

Check Shojobs of the report server named “aibl_reports”

http://17.17.27.39:9002/reports/rwservlet/showjobs?server=aibl_reports

===================================================================
Step-21: Necessary Scripts: ===================================================================

$ # Start NodeManager (if you configured one-per-domain)
[root@wls12c02 ~]# nohup $DOMAIN_HOME/bin/startNodeManager.sh > /dev/null 2>&1 &

$ # Start WebLogic
[root@wls12c02 ~]# nohup $DOMAIN_HOME/bin/startWebLogic.sh > /dev/null 2>&1 &
$ # or
[root@wls12c02 ~]# nohup $DOMAIN_HOME/bin/startWebLogic.sh > /dev/null 2>&1 &
$ # Stop WebLogic
[root@wls12c02 ~]# $DOMAIN_HOME/bin/stopWebLogic.sh
$ # Start Managed Server
[root@wls12c02 ~]# nohup $DOMAIN_HOME/bin/startManagedWebLogic.sh AdminServer > /dev/null 2>&1 &
$ # Stop Managed Server
[root@wls12c02 ~]# $DOMAIN_HOME/bin/stopManagedWebLogic.sh AdminServer

$ # Start the configuration wizard
[root@wls12c02 ~]# $WLS_HOME/common/bin/config.sh

—————————–END———————–

Container Database (CDB) and a Pluggable Database (PDB) recovery in Oracle Database 12c Release 2 using RMAN

================================================

Container Database (CDB) Full Recovery

================================================

Restoring a CDB is similar to restoring a non-CDB database, but remember restoring a whole CDB will restore not only the root container, but all the PDBs also.
Same in a Point In Time Recovery (PITR) of the whole CDB will bring all PDBs back to the same point in time.
Connect to RMAN using OS authentication and restore the whole CDB using the following restore script. This means you are connecting to the root container with “AS SYSDBA” privilege.

[oracle@ram admin]$ rman target /

Recovery Manager: Release 12.2.0.1.0 – Production on Tue Mar 30 19:45:41 2022

Copyright (c) 1982, 2017, Oracle and/or its affiliates. All rights reserved.

connected to target database: DBWR (DBID=1322876759)

RMAN> RUN {
SHUTDOWN IMMEDIATE;
STARTUP MOUNT;
RESTORE DATABASE;
RECOVER DATABASE;
ALTER DATABASE OPEN;
}

using target database control file instead of recovery catalog
database closed
database dismounted
Oracle instance shut down

connected to target database (not started)
Oracle instance started
database mounted

Total System Global Area 2516582400 bytes

Fixed Size 8795904 bytes
Variable Size 671090944 bytes
Database Buffers 1828716544 bytes
Redo Buffers 7979008 bytes

Starting restore at 30-MAR-22
allocated channel: ORA_DISK_1
channel ORA_DISK_1: SID=35 device type=DISK

skipping datafile 5; already restored to file /u01/app/oracle/oradata/DBWR/datafile/o1_mf_system_fvgr1m0c_.dbf
skipping datafile 6; already restored to file /u01/app/oracle/oradata/DBWR/datafile/o1_mf_sysaux_fvgr1m08_.dbf
skipping datafile 8; already restored to file /u01/app/oracle/oradata/DBWR/datafile/o1_mf_undotbs1_fvgr1m0f_.dbf
skipping datafile 13; already restored to file /u01/app/oracle/oradata/DBWR/777D95E41A572D82E053DD971D40E224/datafile/o1_mf_system_fvgzcl9q_.dbf
skipping datafile 14; already restored to file /u01/app/oracle/oradata/DBWR/777D95E41A572D82E053DD971D40E224/datafile/o1_mf_sysaux_fvgzclb4_.dbf
skipping datafile 15; already restored to file /u01/app/oracle/oradata/DBWR/777D95E41A572D82E053DD971D40E224/datafile/o1_mf_undotbs1_fvgzclb5_.dbf
skipping datafile 16; already restored to file /u01/app/oracle/oradata/DBWR/777D95E41A572D82E053DD971D40E224/datafile/o1_mf_users_fvgzd8cs_.dbf
skipping datafile 21; already restored to file /u01/app/oracle/oradata/DBWR/datafile/o1_mf_system_fvhgn44z_.dbf
skipping datafile 22; already restored to file /u01/app/oracle/oradata/DBWR/datafile/o1_mf_sysaux_fvhgn44v_.dbf
skipping datafile 24; already restored to file /u01/app/oracle/oradata/DBWR/datafile/o1_mf_users_fvhgn454_.dbf
skipping datafile 23; already restored to file /u01/app/oracle/oradata/DBWR/datafile/o1_mf_undotbs1_fvhgn452_.dbf
channel ORA_DISK_1: starting datafile backup set restore
channel ORA_DISK_1: specifying datafile(s) to restore from backup set
channel ORA_DISK_1: restoring datafile 00004 to /u01/app/oracle/oradata/DBWR/datafile/o1_mf_undotbs1_fvgqyx60_.dbf
channel ORA_DISK_1: reading from backup piece /u01/app/oracle/fast_recovery_area/dbwr/DBWR/backupset/2018_10_09/o1_mf_nnndf_TAG20181009T032653_fvqno5rt_.bkp
channel ORA_DISK_1: piece handle=/u01/app/oracle/fast_recovery_area/dbwr/DBWR/backupset/2018_10_09/o1_mf_nnndf_TAG20181009T032653_fvqno5rt_.bkp tag=TAG20181009T032653
channel ORA_DISK_1: restored backup piece 1
channel ORA_DISK_1: restore complete, elapsed time: 00:00:03
channel ORA_DISK_1: starting datafile backup set restore
channel ORA_DISK_1: specifying datafile(s) to restore from backup set
channel ORA_DISK_1: restoring datafile 00001 to /u01/app/oracle/oradata/DBWR/datafile/o1_mf_system_fvgqv1n6_.dbf
channel ORA_DISK_1: restoring datafile 00003 to /u01/app/oracle/oradata/DBWR/datafile/o1_mf_sysaux_fvgqxhq9_.dbf
channel ORA_DISK_1: reading from backup piece /u01/app/oracle/fast_recovery_area/dbwr/DBWR/backupset/2018_10_09/o1_mf_nnndf_TAG20181009T182505_fvs999th_.bkp
channel ORA_DISK_1: piece handle=/u01/app/oracle/fast_recovery_area/dbwr/DBWR/backupset/2018_10_09/o1_mf_nnndf_TAG20181009T182505_fvs999th_.bkp tag=TAG20181009T182505
channel ORA_DISK_1: restored backup piece 1
channel ORA_DISK_1: restore complete, elapsed time: 00:00:35
channel ORA_DISK_1: starting datafile backup set restore
channel ORA_DISK_1: specifying datafile(s) to restore from backup set
channel ORA_DISK_1: restoring datafile 00007 to /u01/app/oracle/oradata/DBWR/datafile/o1_mf_users_fvgqyy96_.dbf
channel ORA_DISK_1: reading from backup piece /u01/app/oracle/fast_recovery_area/dbwr/DBWR/backupset/2018_10_09/o1_mf_nnndf_TAG20181009T183709_fvsb0to6_.bkp
channel ORA_DISK_1: piece handle=/u01/app/oracle/fast_recovery_area/dbwr/DBWR/backupset/2018_10_09/o1_mf_nnndf_TAG20181009T183709_fvsb0to6_.bkp tag=TAG20181009T183709
channel ORA_DISK_1: restored backup piece 1
channel ORA_DISK_1: restore complete, elapsed time: 00:00:01
Finished restore at 30-MAR-22

Starting recover at 30-MAR-22
using channel ORA_DISK_1

starting media recovery
media recovery complete, elapsed time: 00:00:02

Finished recover at 30-MAR-22

Statement processed

================================================

Root Container Full Recovery

================================================

Instead of recovering the whole CDB, including all PDBs, the root container can be recovered in isolation.
Connect to RMAN using OS authentication and restore the root container using the following restore script.
It means you are connecting to the root container with “AS SYSDBA” privilege.

Root Container Full Recovery

Instead of recovering the whole CDB, including all PDBs, the root container can be recovered in isolation.
Connect to RMAN using OS authentication and restore the root container using the following restore script.
It means you are connecting to the root container with “AS SYSDBA” privilege.

[oracle@ram admin]$ rman target /

Recovery Manager: Release 12.2.0.1.0 – Production on Tue Mar 30 20:09:10 2022

Copyright (c) 1982, 2017, Oracle and/or its affiliates. All rights reserved.

connected to target database: DBWR (DBID=1322876759)

RMAN> RUN {
SHUTDOWN IMMEDIATE;
STARTUP MOUNT;
RESTORE DATABASE ROOT;
RECOVER DATABASE ROOT;
ALTER DATABASE OPEN;
}

using target database control file instead of recovery catalog
database closed
database dismounted
Oracle instance shut down

connected to target database (not started)
Oracle instance started
database mounted

Total System Global Area 2516582400 bytes

Fixed Size 8795904 bytes
Variable Size 671090944 bytes
Database Buffers 1828716544 bytes
Redo Buffers 7979008 bytes

Starting restore at 30-MAR-22
allocated channel: ORA_DISK_1
channel ORA_DISK_1: SID=8 device type=DISK

channel ORA_DISK_1: starting datafile backup set restore
channel ORA_DISK_1: specifying datafile(s) to restore from backup set
channel ORA_DISK_1: restoring datafile 00004 to /u01/app/oracle/oradata/DBWR/datafile/o1_mf_undotbs1_fvgqyx60_.dbf
channel ORA_DISK_1: reading from backup piece /u01/app/oracle/fast_recovery_area/dbwr/DBWR/backupset/2018_10_09/o1_mf_nnndf_TAG20181009T032653_fvqno5rt_.bkp
channel ORA_DISK_1: piece handle=/u01/app/oracle/fast_recovery_area/dbwr/DBWR/backupset/2018_10_09/o1_mf_nnndf_TAG20181009T032653_fvqno5rt_.bkp tag=TAG20181009T032653
channel ORA_DISK_1: restored backup piece 1
channel ORA_DISK_1: restore complete, elapsed time: 00:00:03
channel ORA_DISK_1: starting datafile backup set restore
channel ORA_DISK_1: specifying datafile(s) to restore from backup set
channel ORA_DISK_1: restoring datafile 00001 to /u01/app/oracle/oradata/DBWR/datafile/o1_mf_system_fvgqv1n6_.dbf
channel ORA_DISK_1: restoring datafile 00003 to /u01/app/oracle/oradata/DBWR/datafile/o1_mf_sysaux_fvgqxhq9_.dbf
channel ORA_DISK_1: reading from backup piece /u01/app/oracle/fast_recovery_area/dbwr/DBWR/backupset/2018_10_09/o1_mf_nnndf_TAG20181009T182505_fvs999th_.bkp
channel ORA_DISK_1: piece handle=/u01/app/oracle/fast_recovery_area/dbwr/DBWR/backupset/2018_10_09/o1_mf_nnndf_TAG20181009T182505_fvs999th_.bkp tag=TAG20181009T182505
channel ORA_DISK_1: restored backup piece 1
channel ORA_DISK_1: restore complete, elapsed time: 00:00:27
channel ORA_DISK_1: starting datafile backup set restore
channel ORA_DISK_1: specifying datafile(s) to restore from backup set
channel ORA_DISK_1: restoring datafile 00007 to /u01/app/oracle/oradata/DBWR/datafile/o1_mf_users_fvgqyy96_.dbf
channel ORA_DISK_1: reading from backup piece /u01/app/oracle/fast_recovery_area/dbwr/DBWR/backupset/2018_10_09/o1_mf_nnndf_TAG20181009T183709_fvsb0to6_.bkp
channel ORA_DISK_1: piece handle=/u01/app/oracle/fast_recovery_area/dbwr/DBWR/backupset/2018_10_09/o1_mf_nnndf_TAG20181009T183709_fvsb0to6_.bkp tag=TAG20181009T183709
channel ORA_DISK_1: restored backup piece 1
channel ORA_DISK_1: restore complete, elapsed time: 00:00:01
Finished restore at 30-MAR-22

Starting recover at 30-MAR-22
using channel ORA_DISK_1

starting media recovery
media recovery complete, elapsed time: 00:00:02

Finished recover at 30-MAR-22

Statement processed

It is not a good to restore and recover just the root container without doing the same for the PDBs.
If there any difference in metadata between the two could create problem.so better avoid this.

================================================

Pluggable Database (PDB) Recovery Scenario

================================================

There are two ways to restore and recover PDBs.
1.Connect to root containers, you can restore and recover one or more PDBs.
2.Connect directly to a PDB, you can restore and recover the current PDB using a local user with the SYSDBA privilege.
[oracle@ram ~]$ rman target /

Recovery Manager: Release 12.2.0.1.0 – Production on Tue Mar 30 20:23:47 2022

Copyright (c) 1982, 2017, Oracle and/or its affiliates. All rights reserved.

connected to target database: DBWR (DBID=1322876759)

RMAN> RUN {
ALTER PLUGGABLE DATABASE pdb5, pdb6 CLOSE;
RESTORE PLUGGABLE DATABASE pdb5, pdb6;
RECOVER PLUGGABLE DATABASE pdb5, pdb6;
ALTER PLUGGABLE DATABASE pdb5, pdb6 OPEN;
}2> 3> 4> 5> 6>

using target database control file instead of recovery catalog
Statement processed

Starting restore at 09-OCT-18
allocated channel: ORA_DISK_1
channel ORA_DISK_1: SID=33 device type=DISK

skipping datafile 13; already restored to file /u01/app/oracle/oradata/DBWR/777D95E41A572D82E053DD971D40E224/datafile/o1_mf_system_fvgzcl9q_.dbf
skipping datafile 14; already restored to file /u01/app/oracle/oradata/DBWR/777D95E41A572D82E053DD971D40E224/datafile/o1_mf_sysaux_fvgzclb4_.dbf
skipping datafile 15; already restored to file /u01/app/oracle/oradata/DBWR/777D95E41A572D82E053DD971D40E224/datafile/o1_mf_undotbs1_fvgzclb5_.dbf
skipping datafile 16; already restored to file /u01/app/oracle/oradata/DBWR/777D95E41A572D82E053DD971D40E224/datafile/o1_mf_users_fvgzd8cs_.dbf
skipping datafile 21; already restored to file /u01/app/oracle/oradata/DBWR/datafile/o1_mf_system_fvhgn44z_.dbf
skipping datafile 22; already restored to file /u01/app/oracle/oradata/DBWR/datafile/o1_mf_sysaux_fvhgn44v_.dbf
skipping datafile 24; already restored to file /u01/app/oracle/oradata/DBWR/datafile/o1_mf_users_fvhgn454_.dbf
skipping datafile 23; already restored to file /u01/app/oracle/oradata/DBWR/datafile/o1_mf_undotbs1_fvhgn452_.dbf
restore not done; all files read only, offline, excluded, or already restored
Finished restore at 30-MAR-22

Starting recover at 30-MAR-22
using channel ORA_DISK_1

starting media recovery
media recovery complete, elapsed time: 00:00:00

Finished recover at 30-MAR-22

Statement processed

Alternate way,

[oracle@ram ~]$ sqlplus sys@pdb5 as sysdba

SQL*Plus: Release 12.2.0.1.0 Production on Tue Oct 9 20:27:27 2018

Copyright (c) 1982, 2016, Oracle. All rights reserved.

Enter password:

Connected to:
Oracle Database 12c Enterprise Edition Release 12.2.0.1.0 – 64bit Production

SQL> CREATE USER prasath IDENTIFIED BY prasath;

User created.

SQL> GRANT CREATE SESSION, PDB_DBA, SYSDBA TO prasath;

Grant succeeded.

SQL> exit
Disconnected from Oracle Database 12c Enterprise Edition Release 12.2.0.1.0 – 64bit Production

[oracle@ram ~]$ rman target=prasath@pdb5

Recovery Manager: Release 12.2.0.1.0 – Production on Tue Mar 30 20:28:54 2022

Copyright (c) 1982, 2017, Oracle and/or its affiliates. All rights reserved.

target database Password:
connected to target database: DBWR:PDB5 (DBID=2599175923)

RMAN> SHUTDOWN IMMEDIATE;
RESTORE DATABASE;
RECOVER DATABASE;
STARTUP;
using target database control file instead of recovery catalog
database closed

RMAN>
Starting restore at 09-OCT-18
allocated channel: ORA_DISK_1
channel ORA_DISK_1: SID=8 device type=DISK

channel ORA_DISK_1: starting datafile backup set restore
channel ORA_DISK_1: specifying datafile(s) to restore from backup set
channel ORA_DISK_1: restoring datafile 00023 to /u01/app/oracle/oradata/DBWR/datafile/o1_mf_undotbs1_fvhgn452_.dbf
channel ORA_DISK_1: reading from backup piece /u01/app/oracle/fast_recovery_area/dbwr/DBWR/77813D4B379738F5E0536501A8C05864/backupset/2018_10_09/o1_mf_nnndf_TAG20181009T032653_fvqnpr4p_.bkp
channel ORA_DISK_1: piece handle=/u01/app/oracle/fast_recovery_area/dbwr/DBWR/77813D4B379738F5E0536501A8C05864/backupset/2018_10_09/o1_mf_nnndf_TAG20181009T032653_fvqnpr4p_.bkp tag=TAG20181009T032653
channel ORA_DISK_1: restored backup piece 1
channel ORA_DISK_1: restore complete, elapsed time: 00:00:07
channel ORA_DISK_1: starting datafile backup set restore
channel ORA_DISK_1: specifying datafile(s) to restore from backup set
channel ORA_DISK_1: restoring datafile 00021 to /u01/app/oracle/oradata/DBWR/datafile/o1_mf_system_fvhgn44z_.dbf
channel ORA_DISK_1: restoring datafile 00022 to /u01/app/oracle/oradata/DBWR/datafile/o1_mf_sysaux_fvhgn44v_.dbf
channel ORA_DISK_1: restoring datafile 00024 to /u01/app/oracle/oradata/DBWR/datafile/o1_mf_users_fvhgn454_.dbf
channel ORA_DISK_1: reading from backup piece /u01/app/oracle/fast_recovery_area/dbwr/DBWR/77813D4B379738F5E0536501A8C05864/backupset/2018_10_09/o1_mf_nnndf_TAG20181009T183030_fvs9mgjy_.bkp
channel ORA_DISK_1: piece handle=/u01/app/oracle/fast_recovery_area/dbwr/DBWR/77813D4B379738F5E0536501A8C05864/backupset/2018_10_09/o1_mf_nnndf_TAG20181009T183030_fvs9mgjy_.bkp tag=TAG20181009T183030
channel ORA_DISK_1: restored backup piece 1
channel ORA_DISK_1: restore complete, elapsed time: 00:00:25
Finished restore at 30-MAR-22

RMAN>
Starting recover at 30-MAR-22
using channel ORA_DISK_1

starting media recovery
media recovery complete, elapsed time: 00:00:00

Finished recover at 30-MAR-22

================================================

Tablespace and Datafile Recovery

================================================

Restoring a tablespace must be connected to the PDB.
But Datafile restoring can connected to the container or directly to the PDB.
[oracle@ram ~]$ rman target=sys@pdb5

Recovery Manager: Release 12.2.0.1.0 – Production on Tue Mar 30 20:48:06 2022

Copyright (c) 1982, 2017, Oracle and/or its affiliates. All rights reserved.

target database Password:

connected to target database: DBWR:PDB5 (DBID=2599175923)

RMAN> RUN {
ALTER TABLESPACE users OFFLINE;
RESTORE TABLESPACE users;
RECOVER TABLESPACE users;
ALTER TABLESPACE users ONLINE;
}

using target database control file instead of recovery catalog
Statement processed

Starting restore at 09-OCT-18
allocated channel: ORA_DISK_1
channel ORA_DISK_1: SID=68 device type=DISK

channel ORA_DISK_1: starting datafile backup set restore
channel ORA_DISK_1: specifying datafile(s) to restore from backup set
channel ORA_DISK_1: restoring datafile 00024 to /u01/app/oracle/oradata/DBWR/datafile/o1_mf_users_fvhgn454_.dbf
channel ORA_DISK_1: reading from backup piece /u01/app/oracle/fast_recovery_area/dbwr/DBWR/77813D4B379738F5E0536501A8C05864/backupset/2018_10_09/o1_mf_nnndf_TAG20181009T183030_fvs9mgjy_.bkp
channel ORA_DISK_1: piece handle=/u01/app/oracle/fast_recovery_area/dbwr/DBWR/77813D4B379738F5E0536501A8C05864/backupset/2018_10_09/o1_mf_nnndf_TAG20181009T183030_fvs9mgjy_.bkp tag=TAG20181009T183030
channel ORA_DISK_1: restored backup piece 1
channel ORA_DISK_1: restore complete, elapsed time: 00:00:01
Finished restore at 30-MAR-22

Starting recover at 30-MAR-22
using channel ORA_DISK_1
applied offline range to datafile 00024
offline range RECID=69 STAMP=989095658

starting media recovery
media recovery complete, elapsed time: 00:00:00

Finished recover at 30-MAR-22

Statement processed

================================================

Datafile Recovery

================================================

[oracle@ram ~]$ rman target=sys@pdb5

Recovery Manager: Release 12.2.0.1.0 – Production on Tue Mar 30 20:51:24 2022

Copyright (c) 1982, 2017, Oracle and/or its affiliates. All rights reserved.

target database Password:
connected to target database: DBWR:PDB5 (DBID=2599175923)

RMAN> RUN {
ALTER DATABASE DATAFILE 24 OFFLINE;
RESTORE DATAFILE 24;
RECOVER DATAFILE 24;
ALTER DATABASE DATAFILE 24 ONLINE;
}

using target database control file instead of recovery catalog
Statement processed

Starting restore at 30-MAR-22
allocated channel: ORA_DISK_1
channel ORA_DISK_1: SID=53 device type=DISK

channel ORA_DISK_1: starting datafile backup set restore
channel ORA_DISK_1: specifying datafile(s) to restore from backup set
channel ORA_DISK_1: restoring datafile 00024 to /u01/app/oracle/oradata/DBWR/datafile/o1_mf_users_fvhgn454_.dbf
channel ORA_DISK_1: reading from backup piece /u01/app/oracle/fast_recovery_area/dbwr/DBWR/77813D4B379738F5E0536501A8C05864/backupset/2018_10_09/o1_mf_nnndf_TAG20181009T183030_fvs9mgjy_.bkp
channel ORA_DISK_1: piece handle=/u01/app/oracle/fast_recovery_area/dbwr/DBWR/77813D4B379738F5E0536501A8C05864/backupset/2018_10_09/o1_mf_nnndf_TAG20181009T183030_fvs9mgjy_.bkp tag=TAG20181009T183030
channel ORA_DISK_1: restored backup piece 1
channel ORA_DISK_1: restore complete, elapsed time: 00:00:01
Finished restore at 30-MAR-22

Starting recover at 30-MAR-22
using channel ORA_DISK_1
applied offline range to datafile 00024
offline range RECID=69 STAMP=989095658

starting media recovery
media recovery complete, elapsed time: 00:00:01

Finished recover at 30-MAR-22

Statement processed.

Creating a Backup Based RMAN Duplicate Database in Oracle 12cR2

Duplicate a database from its backups without connecting to source database.This technique is advantageous where network connections from the auxiliary host to the source database are restricted or prone to intermittent disruptions.In duplication without a TARGET connection, the source database is unaffected by the duplication. RMAN duplication, we will connect rman to the auxiliary instance and run duplicate command.

==================================================
Step_1: Backup Source Database
==================================================

SQL> select name,open_mode,dbid from v$database;

NAME OPEN_MODE DBID
——— ——————– ———-
ABABIL READ WRITE 1226709381

==================================================
Step_2: Look into the Backup Script from Catalog server:
==================================================

[oracle@catdb ~]$ cat rmanprod_full.sh
# Oracle RMAN Database Backup thru Tivoli Data Protection for Oracle. Note that
# Oracle database should be in running mode for the backup to succeed

Date=`date +%d%b%Y`.`date +%I`.`date +%M%p`
export ORACLE_HOME=/home/oracle/u01/app/oracle/product/12.2.0.1/db_1
$ORACLE_HOME/bin/rman catalog rcat/pwd@catdb target sys/pwd@ababil log /home/oracle/u01/app/oracle/rmanprod_log/rman_full_$Date.log<< !

run{
ALLOCATE CHANNEL disk1 DEVICE TYPE DISK MAXPIECESIZE 100G FORMAT ‘/rmanfs/rmanback/rman_db_%T_%U.log’;
backup incremental level 0 database;
backup archivelog all;
}

==================================================
Step_3: Taking the RMAN Backup from catalog server
==================================================[oracle@catdb ~]$ nohup sh rmanprod_full.sh &

Recovery Manager: Release 12.2.0.1.0 – Production on Thu Mar 19 18:25:08 2020

Copyright (c) 1982, 2017, Oracle and/or its affiliates. All rights reserved.

connected to target database: ABABIL (DBID=1226709381)
connected to recovery catalog database

RMAN>
RMAN> 2> 3> 4> 5> 6> 7>
starting full resync of recovery catalog
full resync complete
allocated channel: disk1
channel disk1: SID=838 device type=DISK

Starting backup at 19-MAR-20
channel disk1: starting incremental level 0 datafile backup set
channel disk1: specifying datafile(s) in backup set
input datafile file number=00005 name=/indexfs1/oradata/ababil/index/ababil_index_ts01.dbf
input datafile file number=00007 name=/databasefs1/oradata/ababil/data/ababil_ts01.dbf
input datafile file number=00008 name=/databasefs1/oradata/ababil/data/ababil_ts02.dbf
input datafile file number=00009 name=/databasefs2/oradata/ababil/data/ababil_ts03.dbf
input datafile file number=00011 name=/indexfs2/oradata/ababil/index/ababil_index_ts02.dbf
input datafile file number=00012 name=/databasefs3/oradata/ababil/data/ababil_ts04.dbf
input datafile file number=00014 name=/databasefs5/oradata/ababil/data/agent_ts01.dbf
input datafile file number=00017 name=/indexfs3/oradata/ababil/index/ababil_index_ts03.dbf
input datafile file number=00018 name=/databasefs5/oradata/ababil/data/ababil_ts07.dbf
input datafile file number=00019 name=/indexfs4/oradata/ababil/index/ababil_index_ts04.dbf
input datafile file number=00020 name=/databasefs2/oradata/ababil/data/ababil_ts08.dbf
input datafile file number=00013 name=/databasefs3/oradata/ababil/data/ababil_ts05.dbf
input datafile file number=00016 name=/databasefs4/oradata/ababil/data/ababil_ts06.dbf
input datafile file number=00015 name=/indexfs4/oradata/ababil/index/agent_index_ts01.dbf
input datafile file number=00021 name=/databasefs4/oradata/ababil/data/ababil_ts09.dbf
input datafile file number=00024 name=/databasefs6/oradata/ababil/data/ababil_ts10.dbf
input datafile file number=00006 name=/imagefs/oradata/ababil/data/ababil_image_ts01.dbf
input datafile file number=00022 name=/indexfs1/oradata/ababil/index/ababil_index_ts05.dbf
input datafile file number=00010 name=/auditfs/ababil/auditts01.dbf
input datafile file number=00003 name=/undofs/oradata/ababil/undo/ababil_undo_tbs01.dbf
input datafile file number=00023 name=/databasefs6/oradata/ababil/data/agent_ts02.dbf
input datafile file number=00002 name=/dbsystemfs/oradata/ababil/sysaux01.dbf
input datafile file number=00001 name=/dbsystemfs/oradata/ababil/system01.dbf
input datafile file number=00025 name=/databasefs7/oradata/ababil/data/db_security_01.dbf
input datafile file number=00004 name=/dbsystemfs/oradata/ababil/users/users01.dbf
channel disk1: starting piece 1 at 19-MAR-20
channel disk1: finished piece 1 at 19-MAR-20
piece handle=/rmanfs/rmanback/rman_db_20200319_9kurgfes_1_1.log tag=TAG20200319T183715 comment=NONE
channel disk1: starting piece 2 at 19-MAR-20
channel disk1: finished piece 2 at 19-MAR-20
piece handle=/rmanfs/rmanback/rman_db_20200319_9kurgfes_2_1.log tag=TAG20200319T183715 comment=NONE
channel disk1: starting piece 3 at 19-MAR-20
channel disk1: finished piece 3 at 19-MAR-20
piece handle=/rmanfs/rmanback/rman_db_20200319_9kurgfes_3_1.log tag=TAG20200319T183715 comment=NONE
channel disk1: starting piece 4 at 19-MAR-20
channel disk1: finished piece 4 at 19-MAR-20
piece handle=/rmanfs/rmanback/rman_db_20200319_9kurgfes_4_1.log tag=TAG20200319T183715 comment=NONE
channel disk1: starting piece 5 at 19-MAR-20
channel disk1: finished piece 5 at 19-MAR-20
piece handle=/rmanfs/rmanback/rman_db_20200319_9kurgfes_5_1.log tag=TAG20200319T183715 comment=NONE
channel disk1: starting piece 6 at 19-MAR-20
channel disk1: finished piece 6 at 19-MAR-20
piece handle=/rmanfs/rmanback/rman_db_20200319_9kurgfes_6_1.log tag=TAG20200319T183715 comment=NONE
channel disk1: backup set complete, elapsed time: 00:35:50
Finished backup at 19-MAR-20

Starting backup at 19-MAR-20
current log archived
channel disk1: starting archived log backup set
channel disk1: specifying archived log(s) in backup set
input archived log thread=1 sequence=152 RECID=93312 STAMP=1035409066
input archived log thread=1 sequence=153 RECID=93315 STAMP=1035409081
input archived log thread=1 sequence=154 RECID=93318 STAMP=1035409099
input archived log thread=1 sequence=155 RECID=93321 STAMP=1035409123
input archived log thread=1 sequence=156 RECID=93324 STAMP=1035409141
input archived log thread=1 sequence=157 RECID=93327 STAMP=1035409165
input archived log thread=1 sequence=158 RECID=93330 STAMP=1035409189
input archived log thread=1 sequence=159 RECID=93333 STAMP=1035424717
input archived log thread=1 sequence=160 RECID=93336 STAMP=1035441356
input archived log thread=1 sequence=161 RECID=93338 STAMP=1035444973
input archived log thread=1 sequence=162 RECID=93343 STAMP=1035448564
input archived log thread=1 sequence=163 RECID=93346 STAMP=1035454415
input archived log thread=1 sequence=164 RECID=93349 STAMP=1035456122
input archived log thread=1 sequence=165 RECID=93352 STAMP=1035457496
input archived log thread=1 sequence=166 RECID=93355 STAMP=1035459302
input archived log thread=1 sequence=167 RECID=93358 STAMP=1035461138
input archived log thread=1 sequence=168 RECID=93361 STAMP=1035463247
input archived log thread=1 sequence=169 RECID=93364 STAMP=1035464630
input archived log thread=1 sequence=170 RECID=93367 STAMP=1035467297
input archived log thread=1 sequence=171 RECID=93370 STAMP=1035469667
input archived log thread=1 sequence=172 RECID=93373 STAMP=1035471851
input archived log thread=1 sequence=173 RECID=93376 STAMP=1035473381
input archived log thread=1 sequence=174 RECID=93379 STAMP=1035475266
input archived log thread=1 sequence=175 RECID=93382 STAMP=1035477290
input archived log thread=1 sequence=176 RECID=93385 STAMP=1035479949
input archived log thread=1 sequence=177 RECID=93388 STAMP=1035482178
input archived log thread=1 sequence=178 RECID=93391 STAMP=1035484440
input archived log thread=1 sequence=179 RECID=93394 STAMP=1035486616
input archived log thread=1 sequence=180 RECID=93397 STAMP=1035486788
channel disk1: starting piece 1 at 19-MAR-20
channel disk1: finished piece 1 at 19-MAR-20
piece handle=/rmanfs/rmanback/rman_db_20200319_9lurghi5_1_1.log tag=TAG20200319T191309 comment=NONE
channel disk1: backup set complete, elapsed time: 00:00:45
Finished backup at 19-MAR-20

Starting Control File and SPFILE Autobackup at 19-MAR-20
piece handle=/archivefs/ABABIL/autobackup/2020_03_19/o1_mf_s_1035486835_h76w0msv_.bkp comment=NONE
Finished Control File and SPFILE Autobackup at 19-MAR-20
released channel: disk1

RMAN>

Recovery Manager complete.
[oracle@catdb rmanprod_log]$

==================================================
Step_4. Pfile: Copy the pfile in new prod database server for example (pfile_p9.txt) in the directory /home/oracle
==================================================

bash-4.4$ cat pfile_p9.txt
ababil.__db_cache_size=41875931136
ababil.__inmemory_ext_roarea=0
ababil.__inmemory_ext_rwarea=0
ababil.__java_pool_size=268435456
ababil.__large_pool_size=1073741824
ababil.__oracle_base=’/orafs/app/oracle’#ORACLE_BASE set from environment
ababil.__pga_aggregate_target=26306674688
ababil.__sga_target=48855252992
ababil.__shared_io_pool_size=0
ababil.__shared_pool_size=4831838208
ababil.__streams_pool_size=536870912
*.archive_lag_target=0
*.audit_file_dest=’/auditfs/auditlog’
*.audit_trail=’DB’,’EXTENDED’
*.compatible=’11.2.0.0.0′
*.control_file_record_keep_time=21
*.control_files=’/redo_controlfs1/ababil/control/ababil_control01.ctl’,’/redo_controlfs2/ababil/control/ababil_control02.ctl’,’/redo_controlfs3/ababil/control/ababil_control03.ctl’
*.db_block_size=8192
*.db_domain=”
*.db_name=’ababil’
*.db_recovery_file_dest=’/archivefs/’
*.db_recovery_file_dest_size=214748364800
*.db_writer_processes=3
*.deferred_segment_creation=FALSE
*.dg_broker_start=FALSE
*.dispatchers='(PROTOCOL=TCP) (SERVICE=ababilXDB)’
*.fast_start_mttr_target=600
*.fast_start_parallel_rollback=’LOW’
*.job_queue_processes=1000
*.log_archive_config=’dg_config=(ababil,adgndc,dcadg)’
*.log_archive_dest_1=’location=USE_DB_RECOVERY_FILE_DEST’,’valid_for=(ALL_LOGFILES, ALL_ROLES)’
#*.log_archive_dest_2=’service=adgndc async valid_for=(online_logfiles,primary_role) db_unique_name=adgndc’
#*.log_archive_dest_3=’service=dcadg async valid_for=(online_logfiles,primary_role) db_unique_name=dcadg’
ababil.log_archive_format=’%t_%s_%r.dbf’
*.log_archive_max_processes=4
*.log_archive_min_succeed_dest=1
ababil.log_archive_trace=0
*.log_buffer=0
*.memory_max_target=386547056640
*.memory_target=300647710720
#*._ALLOW_RESETLOGS_CORRUPTION = TRUE
#*.UNDO_MANAGEMENT = MANUAL
*.open_cursors=1000
*.parallel_max_servers=0
*.pga_aggregate_target=0
*.processes=3000
*.redo_transport_user=”
*.remote_login_passwordfile=’EXCLUSIVE’
ababil.resource_manager_plan=’DEFAULT_MAINTENANCE_PLAN’
*.resource_manager_plan=”
*.sec_case_sensitive_logon=FALSE
*.sessions=4522
*.sga_target=0
*.standby_file_management=’AUTO’
*.transactions=4974
*.undo_retention=1800
*.undo_tablespace=’UNDOTBS1′

==================================================
Step_5. Create required Directories
==================================================

mkdir -p /orafs/fast_recovery_area
mkdir -p /orafs/flash_recovery_area
mkdir -p /orafs/admin/ababil/adump
mkdir -p /orafs/admin/ababil/dpdump
mkdir -p /orafs/admin/ababil/pfile
mkdir -p /undofs/oradata/ababil/undo
mkdir -p /dbsystemfs/oradata/ababil/users/
mkdir -p /indexfs1/oradata/ababil/index/
mkdir -p /indexfs2/oradata/ababil/index/
mkdir -p /indexfs3/oradata/ababil/index/
mkdir -p /indexfs4/oradata/ababil/index/
mkdir -p /imagefs/oradata/ababil/data/
mkdir -p /databasefs1/oradata/ababil/data/
mkdir -p /databasefs2/oradata/ababil/data/
mkdir -p /databasefs3/oradata/ababil/data/
mkdir -p /databasefs4/oradata/ababil/data/
mkdir -p /databasefs5/oradata/ababil/data/
mkdir -p /databasefs6/oradata/ababil/data/
mkdir -p /databasefs7/oradata/ababil/data/
mkdir -p /databasefs8/oradata/ababil/data/
mkdir -p /auditfs/ababil/
mkdir -p /tempfs/oradata/ababil/temp/
mkdir -p /redo_controlfs1/oradata/ababil/redo/
mkdir -p /redo_controlfs2/oradata/ababil/redo/
mkdir -p /redo_controlfs3/oradata/ababil/redo/
mkdir -p /dbsystemfs/oradata/ababil/
mkdir -p /redo_controlfs1/ababil/control
mkdir -p /redo_controlfs2/ababil/control
mkdir -p /redo_controlfs3/ababil/control
mkdir -p /redo_controlfs1/ababil/redo
mkdir -p /redo_controlfs2/ababil/redo
mkdir -p /redo_controlfs3/ababil/redo

==================================================
Step_6. Copy Password for Clone Database
==================================================

bash-4.4$ cd $ORACLE_HOME/dbs
bash-4.4$
bash-4.4$ ls
hc_ababil.dat initababil.ora_bkp orapwababil pff.txt spfileababil.ora
init.ora lkABABIL orapwababil_bkp snapcf_ababil.f
bash-4.4$
bash-4.4$ sftp -oport=2425 172.17.0.5
oracle@172.17.0.5’s password:
Connected to 172.17.0.5.
sftp>
sftp>
sftp> cd /orafs/app/oracle/12.2.0.1/db_1/dbs
sftp>
sftp> put orapwababil
Uploading orapwababil to /orafs/app/oracle/12.2.0.1/db_1/dbs/orapwababil
orapwababil 100% 6144 7.5MB/s 00:00
sftp>

==================================================
Step_7. Set Environment Parameter
==================================================

ORACLE_HOSTNAME=AIBLDCP9PRD; export ORACLE_HOSTNAME
ORACLE_UNQNAME=ababil; export ORACLE_UNQNAME
ORACLE_BASE=/orafs/app/oracle; export ORACLE_BASE
ORACLE_HOME=$ORACLE_BASE/12.2.0.1/db_1; export ORACLE_HOME
ORACLE_SID=ababil; export ORACLE_SID

PATH=$PATH:$ORACLE_HOME/bin; export PATH

LD_LIBRARY_PATH=$ORACLE_HOME/lib:/lib:/usr/lib; export LD_LIBRARY_PATH
CLASSPATH=$ORACLE_HOME/jlib:$ORACLE_HOME/rdbms/jlib; export CLASSPATH

==================================================
Step_8. Startup nomount:
==================================================

SQL> startup nomount pfile=’/home/oracle/pfile_p9.txt’;

==================================================
Step_9. Restore Controlfile:
==================================================

bash-4.4$ $ORACLE_HOME/bin/rman target /
RMAN> restore controlfile from ‘/rmanfs/rmanback/control_12.bkp’;

==================================================
Step_10: Mount Database
==================================================

SQL> alter database mount;

==================================================
Step_11: Catalog DB
==================================================

RMAN> catalog start with ‘/rmanfs/rmanback’;

==================================================
Step_12: Restrore DB
==================================================

ORACLE_HOSTNAME=AIBLDCP9PRD; export ORACLE_HOSTNAME
ORACLE_UNQNAME=ababil; export ORACLE_UNQNAME
ORACLE_BASE=/orafs/app/oracle; export ORACLE_BASE
ORACLE_HOME=$ORACLE_BASE/12.2.0.1/db_1; export ORACLE_HOME
ORACLE_SID=ababil; export ORACLE_SID

PATH=$PATH:$ORACLE_HOME/bin; export PATH

LD_LIBRARY_PATH=$ORACLE_HOME/lib:/lib:/usr/lib; export LD_LIBRARY_PATH
CLASSPATH=$ORACLE_HOME/jlib:$ORACLE_HOME/rdbms/jlib; export CLASSPATH

$ORACLE_HOME/bin/rman target /

—- RMAN Command ———————-

run
{
allocate channel disk1 device type disk;
allocate channel disk2 device type disk;
allocate channel disk3 device type disk;
allocate channel disk4 device type disk;
allocate channel disk5 device type disk;
allocate channel disk6 device type disk;
allocate channel disk7 device type disk;
allocate channel disk8 device type disk;
allocate channel disk9 device type disk;
allocate channel disk10 device type disk;
allocate channel disk11 device type disk;
allocate channel disk12 device type disk;
set newname for datafile 1 to ‘/dbsystemfs/oradata/ababil/system01.dbf’;
set newname for datafile 2 to ‘/dbsystemfs/oradata/ababil/sysaux01.dbf’;
set newname for datafile 3 to ‘/undofs/oradata/ababil/undo/ababil_undo_tbs01.dbf’;
set newname for datafile 4 to ‘/dbsystemfs/oradata/ababil/users/users01.dbf’;
set newname for datafile 5 to ‘/indexfs1/oradata/ababil/index/ababil_index_ts01.dbf’;
set newname for datafile 6 to ‘/imagefs/oradata/ababil/data/ababil_image_ts01.dbf’;
set newname for datafile 7 to ‘/databasefs1/oradata/ababil/data/ababil_ts01.dbf’;
set newname for datafile 8 to ‘/databasefs1/oradata/ababil/data/ababil_ts02.dbf’;
set newname for datafile 9 to ‘/databasefs2/oradata/ababil/data/ababil_ts03.dbf’;
set newname for datafile 10 to ‘/auditfs/ababil/auditts01.dbf’;
set newname for datafile 11 to ‘/indexfs2/oradata/ababil/index/ababil_index_ts02.dbf’;
set newname for datafile 12 to ‘/databasefs3/oradata/ababil/data/ababil_ts04.dbf’;
set newname for datafile 13 to ‘/databasefs3/oradata/ababil/data/ababil_ts05.dbf’;
set newname for datafile 14 to ‘/databasefs5/oradata/ababil/data/agent_ts01.dbf’;
set newname for datafile 15 to ‘/indexfs4/oradata/ababil/index/agent_index_ts01.dbf’;
set newname for datafile 16 to ‘/databasefs4/oradata/ababil/data/ababil_ts06.dbf’;
set newname for datafile 17 to ‘/indexfs3/oradata/ababil/index/ababil_index_ts03.dbf’;
set newname for datafile 18 to ‘/databasefs5/oradata/ababil/data/ababil_ts07.dbf’;
set newname for datafile 19 to ‘/indexfs4/oradata/ababil/index/ababil_index_ts04.dbf’;
set newname for datafile 20 to ‘/databasefs2/oradata/ababil/data/ababil_ts08.dbf’;
set newname for datafile 21 to ‘/databasefs4/oradata/ababil/data/ababil_ts09.dbf’;
set newname for datafile 22 to ‘/indexfs1/oradata/ababil/index/ababil_index_ts05.dbf’;
set newname for datafile 23 to ‘/databasefs6/oradata/ababil/data/agent_ts02.dbf’;
set newname for datafile 24 to ‘/databasefs6/oradata/ababil/data/ababil_ts10.dbf’;
set newname for tempfile 1 to ‘/tempfs/oradata/ababil/temp/temp01.dbf’;
set newname for tempfile 2 to ‘/tempfs/oradata/ababil/temp/ababil_temp_ts01.dbf’;
restore database;
switch datafile all;
switch tempfile all;
release channel disk1;
release channel disk2;
release channel disk3;
release channel disk4;
release channel disk5;
release channel disk6;
release channel disk7;
release channel disk8;
release channel disk9;
release channel disk10;
release channel disk11;
release channel disk12;
}

==================================================
Step_13: Recover Database;
==================================================

RMAN> recover database;
RMAN> alter database open resetlogs;

———(If Needed)—————————————————————————

RMAN> recover database until scn 14231720768628;

/*———- If Errors ORA-01547 ————-

Oracle Error:
ORA-01547: warning: RECOVER succeeded but OPEN RESETLOGS would get error below
ORA-01194: file 1 needs more recovery to be consistent
ORA-01110: data file 1: ‘/dbsystemfs/oradata/ababil/system01.dbf’

———- Solution ————————–
link: https://support.oracle.com/epmos/faces/DocumentDisplay?_afrLoop=254121981785019&parent=EXTERNAL_SEARCH&sourceId=HOWTO&id=1684437.1&_afrWindowMode=0&_adf.ctrl-state=17he169bc_52

1. Check the current status of the datafiles:
set numwidth 30;
set pagesize 50000;
alter session set nls_date_format = ‘DD-MON-RRRR HH24:MI:SS’;
select status,checkpoint_change#,checkpoint_time, resetlogs_change#, resetlogs_time, count(*), fuzzy from v$datafile_header group by status,checkpoint_change#,checkpoint_time, resetlogs_change#, resetlogs_time, fuzzy;
The goal is to have the above query return 1 row and fuzzy column value as NO.

———- xxxxx ————————-
*/

ALTER DATABASE RENAME FILE ‘/redolog01fs/oradata/adgrpt/redo/ababil_redo01.log’ to ‘/redo_controlfs1/ababil/redo/ababil_redo01.log’;
ALTER DATABASE RENAME FILE ‘/redolog02fs/oradata/adgrpt/redo/ababil_redo02.log’ to ‘/redo_controlfs1/ababil/redo/ababil_redo02.log’;
ALTER DATABASE RENAME FILE ‘/redolog01fs/oradata/adgrpt/redo/ababil_redo03.log’ to ‘/redo_controlfs1/ababil/redo/ababil_redo03.log’;
ALTER DATABASE RENAME FILE ‘/redolog02fs/oradata/adgrpt/redo/ababil_redo04.log’ to ‘/redo_controlfs1/ababil/redo/ababil_redo04.log’;
ALTER DATABASE RENAME FILE ‘/redolog01fs/oradata/adgrpt/redo/ababil_redo05.log’ to ‘/redo_controlfs1/ababil/redo/ababil_redo05.log’;
ALTER DATABASE RENAME FILE ‘/redolog02fs/oradata/adgrpt/redo/ababil_redo06.log’ to ‘/redo_controlfs1/ababil/redo/ababil_redo06.log’;

SQL> select * from v$log;

GROUP# THREAD# SEQUENCE# BYTES BLOCKSIZE MEMBERS ARC STATUS FIRST_CHANGE# FIRST_TIM NEXT_CHANGE# NEXT_TIME
———- ———- ———- ———- ———- ———- — —————- ————- ——— ———— ———
1 1 0 104857600 512 1 YES UNUSED 2.1046E+10 19-NOV-18 2.1046E+10 19-NOV-18
2 1 0 104857600 512 1 YES UNUSED 2.1046E+10 19-NOV-18 2.1046E+10 19-NOV-18
6 1 0 524288000 512 1 NO CLEARING_CURRENT 2.1047E+10 19-NOV-18 2.8147E+14
4 1 0 524288000 512 1 YES UNUSED 2.1046E+10 19-NOV-18 2.1047E+10 19-NOV-18
5 1 0 524288000 512 1 YES UNUSED 2.1047E+10 19-NOV-18 2.1047E+10 19-NOV-18
3 1 0 104857600 512 1 YES UNUSED 2.1046E+10 19-NOV-18 2.1046E+10 19-NOV-18

SQL> alter database clear logfile group 6;

Database altered.

RMAN> alter database open resetlogs;

database opened

==================================================
Step_14: Create SPFILE in new Production Database;
==================================================

SQL> create spfile from pfile=’/home/oracle/pfile_p9.txt’;

==================================================
Step_15: Change password of sys in new Productin Database;
==================================================

SQL> alter user sys identified by <pwd> ;

OR Create Password file newly from OS:

orapwd file=orapwababil password=<pwd> entries=10 ignorecase=Y

==================================================
Step_16: Change necessary parameter in new Production Database;
==================================================

SQL> alter system set db_recovery_file_dest=’/archivefs/’ scope=both;

SQL> alter system set db_recovery_file_dest_size=214748364800 scope=both;

SQL> alter system set log_archive_dest_1=’location=USE_DB_RECOVERY_FILE_DEST’,’valid_for=(ALL_LOGFILES, ALL_ROLES)’ scope=both;

SQL> alter system set log_archive_dest_2=’service=adgndc async valid_for=(online_logfiles,primary_role) db_unique_name=adgndc’;

SQL> alter system set log_archive_dest_3=’service=dcadg async valid_for=(online_logfiles,primary_role) db_unique_name=dcadg’;

==================================================
Step_17: Enable DDL Logging in the traqce file
==================================================

SQL> ALTER SYSTEM SET enable_ddl_logging=TRUE;

==================================================
Step_18: Enabling Multithreading
==================================================
SQL> conn / as sysdba
SQL> ALTER SYSTEM SET threaded_execution=true SCOPE=SPFILE;
SQL> shutdown immediate

Steps needed to SSL configure standalone Oracle WebLogic Server (10.3.X – 12.1.X) in Fusion Middleware 11g/12c

Oracle WebLogic Server – Version 10.3.1 to 12.1.3.0.0 Information in this document applies to any platform:

There are three steps needed to configure WebLogic (10.3.X -12.1.X) in Fusion Middleware 11g/12c:

Step I: Create a Java Keystore which contains an SSL Certificate
Step II: Configure WebLogic Server for SSL
Step III: Test you can access Weblogic via SSL

==================================================
Step I. Create a Java Keystore which contains an SSL Certificate
==================================================

All the commands below reference $MIDDLEWARE_HOME for FMW 11g. If using FMW 12c, replace $MIDDLEWARE_HOME with $ORACLE_HOME.

1. Create a directory, for example: $MIDDLEWARE_HOME/keystores
mkdir -p $MIDDLEWARE_HOME/keystores
2. chmod -R 775 $MIDDLEWARE_HOME/keystore
3. cd $MIDDLEWARE_HOME/keystore/
4. keytool -genkey -alias wls_aibl -keyalg RSA -keysize 1024 -sigalg SHA1withRSA -dname “CN=<host_IP>,OU=AIBL,O=AIBL,L=Bangladesh,ST=Dhaka,C=BD” -keypass welcome -keystore keystore.jks -storepass welcome
or
keytool -genkey -alias node1 -keyalg RSA -keysize 1024 -keystore identity1.jks -storepass welcome -keypass welcome

What is your first and last name?
[Unknown]: x.x.x.x
What is the name of your organizational unit?
[Unknown]: AIBL
What is the name of your organization?
[Unknown]: AIBL
What is the name of your City or Locality?
[Unknown]: BANGLADESH
What is the name of your State or Province?
[Unknown]: DHAKA
What is the two-letter country code for this unit?
[Unknown]: BD
Is CN=x.x.x.x, OU=AIBL, O=AIBL, L=DHAKA, ST=DHAKA, C=BD correct?
[no]: yes
5. keytool -exportcert -alias node1 -file node1cert.cer -keystore identity1.jks -storetype JKS
6. keytool -importcert -trustcacerts -alias node1 -file node1cert.cer -keystore Truststore1.jks -storetype JKS
7. keytool -list -v -keystore Truststore1.jks -storepass welcome

==================================================
Step II: Configure WebLogic Server for SSL
==================================================

The steps below take you through configuring SSL for a Managed Server.The steps assumes the reader understands how to start the Admin Server and Managed Server.
1. Start the Admin Server in the Domain
2. Login to the WLS console e.g: http://x.x.x.x:7001/console
3. Select ‘Environment’ -> ‘Servers’ and click on the server you want to configure
4. Select the ‘Keystores’ tab
5. Select ‘Keystore -> ‘Change’
6. Select ‘Custom Identity and Custome Trust’from the drop down list and click ‘Save’
7. Enter the relevant information in the Keystores page:
‘Custom Identity Keystore’ : <path_to_keystore> e.g $MIDDLEWARE/keystores/keystore.jks ‘Custom Identity Keystore’ : JKS
(Note: This has to be UPPERCASE) ‘Custom Identity Keystore Passphrase’ : <storepass_pwd> e.g: welcome ‘Confirm Custom Identity Keystore Passphrase’ : <storepass_pwd> e.g: welcome ‘Custom Trust Keystore’ : <path_to_keystore> e.g $MIDDLEWARE/keystores/keystore.jks ‘Custom Trust Keystore Type’ : JKS (Note: This has to be UPPERCASE) ‘Custom Trust Keystore Passphrase’ : <storepass_pwd> e.g: welcome ‘Confirm Custom Trust Keystore Passphrase’ : <storepass_pwd> e.g: welcome Click ‘Save’
8. Select the ‘SSL’ tab and enter the relevant information:
‘Private Key Alias’ : <alias_given_when_creating_key> e.g server_cert ‘Private Key Password’ : <keypass_pwd> e.g welcome ‘Confirm Private Key Password’: <keypass_pwd> e.g welcome Click ‘Save’
9. Select ‘Environment’ -> ‘Servers’ and click on the Managed Server configured
10. In the ‘General’ tab:
Check ‘SSL Listen Port Enabled’ ‘SSL Listen Port’ : <port> e.g 7012 (make sure this is not used by another process) Click ‘Save’
Note: You would normally have Oracle HTTP Server (OHS) on port 443 forwarding to WebLogic Server (WLS) on another port in an Oracle Fuson Middleware environment. If you were following this for WLS standalone or require both OHS and WLS on port 443 (on separate machines) then see the following to set up on a privileged port:
WebLogic 10.3.x
https://docs.oracle.com/cd/E23943_01/apirefs.1111/e13952/taskhelp/machines/BindToProtectedPortsOnUNIX.htm WebLogic 12c
https://docs.oracle.com/html/E24401_02/taskhelp/machines/BindToProtectedPortsOnUNIX.html
11. Start the Server. If the server is running successfully you will see the following in the standard out or the Managed Server log file:

<Notice> <Server> <BEA-002613> <Channel “DefaultSecure” is now listening on X.X.X.X:7012 for protocols iiops, t3s, ldaps, https.>

==================================================
Step III: Test you can access Weblogic via SSL
==================================================
1. Access Weblogic via SSL e.g: https://x.x.x.x:7012/<uri&gt;

The way to configure ssh/sftp without password in Unix

==================================================
STEP-01: Generate the public key private key pair
==================================================
Generate the public key private key pair for the local host as following, Press enter for default file names and no pass phrase options. The command here generates RSA type keys.You can run the command ssh-keygen from any directory but the id files will be generated in .ssh dir of user’s home directory.

bash-4.4$ ssh-keygen -t rsa

Generating public/private rsa key pair.
Enter file in which to save the key (/home/oracle/.ssh/id_rsa):
Enter passphrase (empty for no passphrase):
Enter same passphrase again:
Your identification has been saved in /home/oracle/.ssh/id_rsa.
Your public key has been saved in /home/oracle/.ssh/id_rsa.pub.
The key fingerprint is:
SHA256:CxfJXnLtoiePoaCrYz+LaYjy/BZiTxEUNiYs9LKxikg oracle@AIBLDCP9PRD
The key’s randomart image is:
+—[RSA 2048]—-+
|.o..*. |
|. o+.. . . . |
| + . . = o . |
| = . . = . |
| E .. S . . |
|= o o o o . |
|*. +.. = . |
|=+ooo. . * |
|=***+ . . . |
+—-[SHA256]—–+

==================================================
STEP-02: Change directory to .ssh directory of user
==================================================
You will see two files starting with id_rsa. id_rsa is the private key and id_rsa.pub is public key. Check the date time stamp of these files to make sure these are the ones you generated recently.

bash-4.4$ cd /home/oracle/.ssh/
bash-4.4$
bash-4.4$
bash-4.4$ ls -lrt
total 524344
-rw-r–r– 1 oracle oinstall 938 Jan 30 20:29 known_hosts
-rw——- 1 oracle oinstall 1766 Feb 12 12:32 id_rsa
-rw-r–r– 1 oracle oinstall 400 Feb 12 12:32 id_rsa.pub

bash-4.4$

==================================================
STEP-03: Copy the rsa public key to the remote host
==================================================
Copy the public key file from above example to .ssh of the user home directory and if .ssh directory is not there , create it as in the example below. You need to enter sftp/ssh password as passwordless access is not setup yet.

bash-4.4$ cd /home/oracle/.ssh/
bash-4.4$
bash-4.4$
bash-4.4$ ls -lrt
total 524344
-rw-r–r– 1 oracle oinstall 938 Jan 30 20:29 known_hosts
-rw——- 1 oracle oinstall 1766 Feb 12 12:32 id_rsa
-rw-r–r– 1 oracle oinstall 400 Feb 12 12:32 id_rsa.pub
-rw-r–r– 1 oracle oinstall 268444656 Feb 12 14:34 core
bash-4.4$
bash-4.4$
bash-4.4$ sftp -oport=2425 172.17.0.X
oracle@172.17.0.X’s password:
Connected to 172.17.0.X.
sftp>
sftp> cd .ssh
sftp>
sftp>
sftp> put id_rsa.pub
Uploading id_rsa.pub to /home/oracle/.ssh/id_rsa.pub
id_rsa.pub 100% 400 492.8KB/s 00:00
sftp>
sftp> bye

==================================================
STEP-04: login to the remote host with password
==================================================
Once file is copied over , login to the remote host using ssh and password and go to .ssh directory under user home directory.

bash-4.4$ ssh -oport=2425 oracle@172.17.0.X
oracle@172.17.0.X’s password:
$ bash
bash-4.4$
bash-4.4$
bash-4.4$
bash-4.4$ cd .ssh/
bash-4.4$
bash-4.4$ pwd
/home/oracle/.ssh
bash-4.4$
bash-4.4$
bash-4.4$ ls -lrt
total 16
-rw-r–r– 1 oracle oinstall 537 Jan 06 17:18 known_hosts
-rw-r–r– 1 oracle oinstall 400 Feb 13 17:23 id_rsa.pub

==================================================
STEP-05: Rename the public key file, id_rsa.pub, to authorized_keys ;
==================================================
Rename or append to file corresponding to the ssh protocol version in your system , User ssh -V to find out the ssh version

SSH protocols 1.3 and 1.5 uses file name as authorized_keys
SSH protocol 2.0 uses file name as authorized_keys2

if the authorized_keys file already exists then append the new keys to the existing file using,

bash-4.4$ cat id_rsa.pub >> authorized_keys
bash-4.4$

Don’t use vi or editor to open , append and save these key files as any extra character/newline would corrupt these files.

bash-4.4$ mv id_rsa.pub authorized_keys
bash-4.4$
bash-4.4$ ls -lrt
total 16
-rw-r–r– 1 oracle oinstall 537 Jan 06 17:18 known_hosts
-rw-r–r– 1 oracle oinstall 400 Feb 13 17:23 authorized_keys

You can see the contents using cat command

bash-4.4$ cat authorized_keys
ssh-rsa AAAAB3NzaC1yc2EAAAADAQABAAABAQC/1ENXnI40kb0QMyGHSw/BlE3zv7IdpxbwGpgs6u4TDycO5rsP0lMayySzzBAi1P2bt/6mLAtsnR7MIMKi3P8TdSHsyb0oT4O4UDZnP7ORTG3jN2rTgKN7yl2A06rHhLUj1i1JnWREC9+77nZE8ArsAPgYRM5lcvGq8dWFVQZGnQjtiuoatdH4AdfSiPIs+thVfbOpL8Fi63QbJhL+wGiLfCo26Hdda1w9LmSEy4+RyKSyJntfApBz7G1R7TX5fmw6lONVunxecISXxwQ55+KTyULCugFKSlpEC4kDpBxH9aFsUmVwfXGGSPR+wrgRZcSVdJ3dUFfNgo9GI2PQXfIr oracle@AIBLDCP9PRD
bash-4.4$

==================================================
STEP-06: Moment of truth : Try a ssh or sftp
==================================================

bash-4.4$ sftp -oport=2425 oracle@172.17.0.X
Enter passphrase for key ‘/home/oracle/.ssh/id_rsa’:
Connected to 172.17.0.X.
sftp>

Oracle 12cR2 Client installation in Solaris 11.4 in Silent mode

Solaris 11.4 is a text installation. Besides, no offline packages is available to install in solaris 11.4. Now to install oracle Client/Database in Solais 11.4, we need to configure DNS first, then to connect online to download the oracle pre-install package. Here i have mention the way to install oracle-pre-install package and configure the enirnment of OS for oracle client/database installation. Finally the steps to install oracle client/database in silent mode.

————————————————————————————————-
Step-01: Search Oracle Latest Package to Install
————————————————————————————————-
root@AIBLPRODLAN02:/# pkg search -r oracle-rdbms-server*

INDEX ACTION VALUE PACKAGE
pkg.fmri set solaris/group/prerequisite/oracle/oracle-rdbms-server-12-1-preinstall pkg:/group/prerequisite/oracle/oracle-rdbms-server-12-1-preinstall@0.5.11-0.175.3.1.0.5.0
pkg.fmri set solaris/group/prerequisite/oracle/oracle-rdbms-server-12cR1-preinstall pkg:/group/prerequisite/oracle/oracle-rdbms-server-12cR1-preinstall@0.5.11-0.175.2.0.0.39.0
pkg.fmri set solaris/group/prerequisite/oracle/oracle-rdbms-server-18c-preinstall pkg:/group/prerequisite/oracle/oracle-rdbms-server-18c-preinstall@11.4-11.4.0.0.1.15.0
root@AIBLPRODLAN02:/#

————————————————————————————————-
Step-02: Installaion of the desired package
————————————————————————————————-
root@AIBLPRODLAN02:/# pkg install pkg:/group/prerequisite/oracle/oracle-rdbms-server-12-1-preinstall

Packages to install: 2
Create boot environment: No
Create backup boot environment: No

DOWNLOAD PKGS FILES XFER (MB) SPEED
Completed 2/2 9/9 0.2/0.2 23.9k/s

PHASE ITEMS
Installing new actions 27/27
Updating package state database Done
Updating package cache 0/0
Updating image state Done
Creating fast lookup database Done
Updating package cache 1/1
root@AIBLPRODLAN02:/#

————————————————————————————————-
Step-03: Post checking of the status of installed package
————————————————————————————————-
root@AIBLPRODLAN02:/# pkg info -r group/prerequisite/oracle/oracle-rdbms-server-12-1-preinstall

Name: group/prerequisite/oracle/oracle-rdbms-server-12-1-preinstall
Summary: Prerequisite package for Oracle Database 12.1
Description: Provides the set of Oracle Solaris packages required for
installation and operation of Oracle Database 12.
Category: Meta Packages/Group Packages
State: Not installed
Publisher: solaris
Version: 11.4
Build Release: 5.11
Branch: 11.4.0.0.1.15.0
Packaging Date: August 17, 2018 12:35:34 AM
Size: 2.52 kB

————————————————————————————————-
Step-04: Add Project on user_attr file
————————————————————————————————-
root@AIBLPRODLAN02:/# projadd oracle
root@AIBLPRODLAN02:/#
root@AIBLPRODLAN02:/# vi /etc/user_attr

# Copyright (c) 1999, 2013, Oracle and/or its affiliates. All rights reserved.
#
# The system provided entries are stored in different files
# under “/etc/user_attr.d”. They should not be copied to this file.
#
# Only local changes should be stored in this file.
#
root::::type=role
aibl::::lock_after_retries=no;profiles=System Administrator;roles=root
oracle::::project=oracle
~

————————————————————————————————-
Step-05: Create the new groups and users.
————————————————————————————————-

root@AIBLPRODLAN02:/# groupadd oinstall
root@AIBLPRODLAN02:/# groupadd dba
root@AIBLPRODLAN02:/# groupadd oper

root@AIBLPRODLAN02:/# useradd -g oinstall -G dba -d /export/home/oracle oracle

————————————————————————————————-
Step-06: Create Directories for oracle user and change the ownership
————————————————————————————————-

root@AIBLPRODLAN01:~# mkdir -p /export/home/oracle/u01/app/oracle/product/12.2.0.1/client_1
root@AIBLPRODLAN01:~# mkdir -p /export/home/oracle/u01/app/oracle/product/oraInventory
root@AIBLPRODLAN01:~# mkdir -p /export/home/oracle/u01/app/oracle/product/release
root@AIBLPRODLAN01:~# chown -R oracle:oinstall /export/home/oracle/u01/app/oracle/product/oraInventory
root@AIBLPRODLAN01:~# chown -R oracle:oinstall /export/home/oracle/u01/app/oracle/product/12.2.0.1/client_1
root@AIBLPRODLAN01:~# chown -R oracle:oinstall /export/home/oracle/u01/app/oracle/product/release

————————————————————————————————-
Step-07: Change the password of oracle user
————————————————————————————————-
root@AIBLPRODLAN02:/# passwd -r files oracle

————————————————————————————————-
Step-08: Changes of project.max-shm-memory
————————————————————————————————-
root@AIBLPRODLAN02:/# prctl -n project.max-shm-memory -v 4gb -r -i project oracle
root@AIBLPRODLAN02:/# projmod -s -K “project.max-shm-memory=(priv,4gb,deny)” oracle
root@AIBLPRODLAN02:/#
root@AIBLPRODLAN02:/# vi /etc/project
system:0::::
user.root:1::::
noproject:2::::
default:3::::
group.oinstall:10::::
oracle:100::::project.max-shm-memory=(priv,4294967296,deny)

————————————————————————————————-
Step-09: Changes in inittab file
————————————————————————————————-
root@AIBLPRODLAN02:/# vi /etc/inittab
#
# Copyright (c) 1988, 2013, Oracle and/or its affiliates. All rights reserved.
#
# The /etc/inittab file controls the configuration of init(1M); for more
# information refer to init(1M) and inittab(4). It is no longer
# necessary to edit inittab(4) directly; administrators should use the
# Solaris Service Management Facility (SMF) to define services instead.
# Refer to smf(5) and the System Administration Guide for more
# information on SMF.
#
# For modifying parameters passed to ttymon, use svccfg(1m) to modify
# the SMF repository. For example:
#
# # svccfg
# svc:> select system/console-login:default
# svc:/system/console-login> setprop ttymon/terminal_type = “xterm”
# svc:/system/console-login> refresh
# svc:/system/console-login> exit
#
dev::sysinit:/usr/sbin/devfsadm -P
ap::sysinit:/usr/sbin/autopush -f /etc/iu.ap
smf::sysinit:/lib/svc/bin/svc.startd >/dev/msglog 2<>/dev/msglog </dev/console
p3:s1234:powerfail:/usr/sbin/shutdown -y -i5 -g0 >/dev/msglog 2<>/dev/msglog
tm::sysinit:/usr/sbin/ndd -set /dev/tcp tcp_smallest_anon_port 9000 > /dev/console
tm::sysinit:/usr/sbin/ndd -set /dev/tcp tcp_largest_anon_port 65500 > /dev/console
tm::sysinit:/usr/sbin/ndd -set /dev/udp udp_smallest_anon_port 9000 > /dev/console
tm::sysinit:/usr/sbin/ndd -set /dev/udp udp_largest_anon_port 65500 > /dev/console

————————————————————————————————-
Step-10: set maxusers in /etc/system file
————————————————————————————————-
root@AIBLPRODLAN02:/# vi /etc/system
*
* SYSTEM SPECIFICATION FILE
*

* It is highly recommened not to edit this file directly but instead
* to deliver fragments into files in /etc/system.d/
*
* The recommended naming for files in /etc/system.d/ is to use the IPS
* package name with the ‘/’ converted to a ‘:’ for example:
* pkg:/mycompany/db-server/hr-db delivers content as
* /etc/system.d/mycompany:db-server:hr-db
*
* When the system boot archive is generated the contents of /etc/system.d
* are placed into a secondary /etc/system file that the kernel will read
* before it reads /etc/system.

* moddir:
*
* Set the search path for modules. This has a format similar to the
* csh path variable. If the module isn’t found in the first directory
* it tries the second and so on. The default is /kernel /usr/kernel
*
* Example:
* moddir: /kernel /usr/kernel /other/modules

* root device and root filesystem configuration:
*
* The following may be used to override the defaults provided by
* the boot program:
*
* rootfs: Set the filesystem type of the root.
*
* rootdev: Set the root device. This should be a fully
* expanded physical pathname. The default is the
* physical pathname of the device where the boot
* program resides. The physical pathname is
* highly platform and configuration dependent.
*
* Example:
* rootfs:ufs
* rootdev:/sbus@1,f8000000/esp@0,800000/sd@3,0:a
*
* (Swap device configuration should be specified in /etc/vfstab.)

* exclude:
*
* Modules appearing in the moddir path which are NOT to be loaded,
* even if referenced. Note that `exclude’ accepts either a module name,
* or a filename which includes the directory.
*
* Examples:
* exclude: win
* exclude: sys/shmsys

* forceload:
*
* Cause these modules to be loaded at boot time, (just before mounting
* the root filesystem) rather than at first reference. Note that
* forceload expects a filename which includes the directory. Also
* note that loading a module does not necessarily imply that it will
* be installed.
*
* Example:
* forceload: drv/foo

* set:
*
* Set an integer variable in the kernel or a module to a new value.
* This facility should be used with caution. See system(4).
*
* Examples:
*
* To set variables in ‘unix’:
*
* set nautopush=32
* set maxusers=40
*
* To set a variable named ‘debug’ in the module named ‘test_module’
*
* set test_module:debug = 0x13
set maxusers=4096

————————————————————————————————-
Step-11: To change the softlimit size
————————————————————————————————-
projmod -s -K “process.max-file-descriptor=(basic,10240,deny)” oracle
projmod -s -K “process.max-stack-size=(basic,10240,deny)” oracle

————————————————————————————————-
Step-12: Change/create the .profile file for oracle user
————————————————————————————————-
bash-4.4$ cat .profile
# Oracle Settings
TMP=/tmp; export TMP
TMPDIR=$TMP; export TMPDIR

# Select the appropriate ORACLE_BASE
ORACLE_HOSTNAME=AIBLPRODLAN03; export ORACLE_HOSTNAME
ORACLE_UNQNAME=latitude; export ORACLE_UNQNAME
ORACLE_BASE=/export/home/oracle/u01/app/oracle; export ORACLE_BASE
ORACLE_HOME=$ORACLE_BASE/product/12.2.0.1/client_1; export ORACLE_HOME
ORACLE_SID=latitude; export ORACLE_SID
PATH=$ORACLE_HOME/bin:$PATH; export PATH

————————————————————————————————-
Step-13: Add following lines in response file
————————————————————————————————-
bash-4.4$ cd /export/home/oracle/soft/client/response
bash-4.4$ vi client_install.rsp

# Additional Oracle Settings
INVENTORY_LOCATION=/export/home/oracle/u01/app/oracle/product/oraInventory
SELECTED_LANGUAGES=en,ar
ORACLE_HOME=/export/home/oracle/u01/app/oracle/product/12.2.0.1/client_1
ORACLE_BASE=/export/home/oracle/u01/app/oracle/product/release
oracle.install.client.installType=Administrator
UNIX_GROUP_NAME=oinstall

————————————————————————————————-
Step-14: run the installer in silent mode
————————————————————————————————-
bash-4.4$ ./runInstaller -ignoreSysPrereqs -showProgress -silent -responseFile /export/home/oracle/soft/client/response/client_install.rsp
Starting Oracle Universal Installer…

Checking Temp space: must be greater than 244 MB. Actual 11568 MB Passed
Checking swap space: must be greater than 150 MB. Actual 12377 MB Passed
Preparing to launch Oracle Universal Installer from /tmp/OraInstall2020-01-28_12-19-40AM. Please wait …bash-4.4$ [WARNING] [INS-32018] The selected Oracle home is outside of Oracle base.
ACTION: Oracle recommends installing Oracle software within the Oracle base directory. Adjust the Oracle home or Oracle base accordingly.
[WARNING] [INS-13014] Target environment does not meet some optional requirements.
CAUSE: Some of the optional prerequisites are not met. See logs for details. installActions2020-01-28_12-19-40AM.log
ACTION: Identify the list of failed prerequisite checks from the log: installActions2020-01-28_12-19-40AM.log. Then either from the log file or from installation manual find the appropriate configuration to meet the prerequisites and fix it manually.
You can find the log of this install session at:
/export/home/oracle/u01/app/oracle/product/oraInventory/logs/installActions2020-01-28_12-19-40AM.log

Prepare in progress.
………………………………………….. 6% Done.

Prepare successful.

Copy files in progress.
………………………………………….. 14% Done.
………………………………………….. 20% Done.
………………………………………….. 25% Done.
………………………………………….. 30% Done.
………………………………………….. 39% Done.
………………………………………….. 44% Done.
………………………………………….. 49% Done.
………………………………………….. 54% Done.
………………………………………….. 59% Done.
………………………………………….. 64% Done.

Copy files successful.

Link binaries in progress.

Link binaries successful.

Setup files in progress.

Setup files successful.

Setup Inventory in progress.

Setup Inventory successful.

Finish Setup in progress.

Finish Setup successful.
The installation of Oracle Client 12c was successful.
Please check ‘/export/home/oracle/u01/app/oracle/product/oraInventory/logs/silentInstall2020-01-28_12-19-40AM.log’ for more details.

Prepare for configuration steps in progress.

Prepare for configuration steps successful.
………………………………………….. 80% Done.

Oracle Client Configuration in progress.

Oracle Client Configuration successful.
………………………………………….. 96% Done.

As a root user, execute the following script(s):
1. /export/home/oracle/u01/app/oracle/product/oraInventory/orainstRoot.sh

………………………………………….. 100% Done.
Successfully Setup Software.

bash-4.4$

————————————————————————————————-
Step-15: Checking the completion of the installaion
————————————————————————————————-
bash-4.4$ sqlplus /nolog

SQL*Plus: Release 12.2.0.1.0 Production on Tue Jan 28 00:22:49 2020

Copyright (c) 1982, 2016, Oracle. All rights reserved.

SQL>

Configuring DNS in Solaris 11.4 Manually

In Solaris-11.4, there have no package available to install offline. That’s why we need to connect online to download the packages and to install them on the host. To configure DNS manually in Solaris 11.4, please follow the below steps:

————————————————————————————————-
Step-01: Connect with root user and enter below commands to configure DNS
————————————————————————————————-

root@AIBLPRODLAN02:~# svccfg
svc:> select dns/client
svc:/network/dns/client> listprop config
config application
config/value_authorization astring solaris.smf.value.name-service.dns.client
config/namesever net_address 8.8.8.8
svc:/network/dns/client>
svc:/network/dns/client> select dns/client:default
svc:/network/dns/client:default> refresh
svc:/network/dns/client:default> validate
svc:/network/dns/client:default>
svc:/network/dns/client:default> select name-service/switch
svc:/system/name-service/switch> listprop config
config application
config/default astring files
config/value_authorization astring solaris.smf.value.name-service.switch
config/printer astring “user files”
svc:/system/name-service/switch>
svc:/system/name-service/switch> setprop config/host = astring: “file dns”
svc:/system/name-service/switch> listprop config
config application
config/default astring files
config/value_authorization astring solaris.smf.value.name-service.switch
config/printer astring “user files”
config/host astring “file dns”
svc:/system/name-service/switch>
svc:/system/name-service/switch> select system/name-service/switch:default
svc:/system/name-service/switch:default> refresh
svc:/system/name-service/switch:default> validate
svc:/system/name-service/switch:default> exit

————————————————————————————————-
Step-02: Enable DNS
————————————————————————————————-

root@AIBLPRODLAN02:~# svcadm enable dns/client
root@AIBLPRODLAN02:~# svcadm refresh name-service/switch
root@AIBLPRODLAN02:~#
root@AIBLPRODLAN02:~# grep hosts /etc/nsswitch.conf
hosts: file dns

root@AIBLPRODLAN02:~# file /etc/resolv.conf
/etc/resolv.conf: ascii text

———————————————————————————————–
Step-03: Recheck the resolv.conf file
———————————————————————————————–

root@AIBLPRODLAN02:/etc# vi /etc/resolv.conf
root@AIBLPRODLAN02:/etc#
root@AIBLPRODLAN02:/etc# cat /etc/resolv.conf
nameserver 8.8.8.8
root@AIBLPRODLAN02:/etc#

———————————————————————————————-
Step-04: Checking hostname ping
———————————————————————————————-

root@AIBLPRODLAN02:/etc# pfexec cp nsswitch.conf nsswitch.conf.orig
root@AIBLPRODLAN02:/etc# pfexec cp nsswitch.dns nsswitch.conf
root@AIBLPRODLAN02:/etc#
root@AIBLPRODLAN02:/etc# svcadm enable /network/dns/multicast

—————————————————————————————
Step-05: Crosscheck with nslookup
—————————————————————————————

root@AIBLPRODLAN02:~# nslookup
> http://www.google.com
Server: 8.8.8.8
Address: 8.8.8.8#53

Non-authoritative answer:
Name: http://www.google.com
Address: 172.217.27.36
> http://www.pkg.oracle.com
Server: 8.8.8.8
Address: 8.8.8.8#53

Audit Vault and Database Firewall Configuration Steps

Oracle Audit Vault and Database Firewall – Version 12.2.0.9 and later Information in this document applies to any platform.

Configuring Audit Vault

STEP-01: After completion of installation of the Audit Vault Server (1-3 CD) put the passphrase to configure as below:

STEP-02: Now we need to set the following user and password in the Post-Install Configuration:
AVADMIN: ***
AVAUDIT: ***
ENCYPTION: ***
Root user: ***
Support user:

Step-03: Login with user AVADMIN

Step-04: Set the permission for SSH as follows (Settings>Services)

Step-05: Set hostname in the AV Server (Settings>Network)

Step-06: Set NTP in the AV Server (Settings>Manage)

FIREWALL:
STEP-01: After completion of installation of the Database Firewall Server (4th CD) put the passphrase to configure as below:

STEP-02: Set following User/Password for Firewall Server after putting passphrase:
passphase: ***
FWADMIN: ***
Root user: ***
Support user: ***

STEP-03: Now to complete the configuration of the Firewall Server log on with FWADMIN user:

STEP-04: Now to SSH Access go to the Systems>Services and allow all as given below:

STEP-05: Now set the NTP from Systems>Date and Time option as given below:

STEP-06: Set the hostname of the Firewall Server from (Systems>Network) option:

STEP-07: Copy the Server Certificate from (Settings>Server Certificate) AV and paste it to the Firewall Server (System>Audit Vault Server) with IP address of the audit vault server

Step-08: Configure DF IN AV (Database Firewall>Database Firewall>Register). Put the hostname of the Database Firewall and the IP address and Save it.

Step-09: adding host in AV (Host>Hosts>Register) and Save it.

Step-10: Now Download Agent for host to deploy:

activation key :

Step-11: Remove Agent from Host (If already exists):

Step-12: Agent Deployment on Host (AIX):

Step-13: Create user and give them permission:
Connected to:
Oracle Database 12c Enterprise Edition Release 12.2.0.1.0 – 64bit Production

SQL>
SQL> select name from v$database;
NAME
———
ABABIL

SQL> create user avdf_user identified by avdf_user;
User Created.

SQL>

Go to /home/oracle/avagent/av/plugins/com.oracle.av.plugin.oracle/config/
and give the user required privileges through the script oracle_user_setup.sql
bash-4.2$ cd /home/oracle/avagent/av/plugins/com.oracle.av.plugin.oracle/config/
bash-4.2$
bash-4.2$ sqlplus / as sysdba

SQL*Plus: Release 12.2.0.1.0 Production on Sun Sep 15 17:35:16 2019

Copyright (c) 1982, 2017, Oracle. All rights reserved.

Connected to:
Oracle Database 12c Enterprise Edition Release 12.2.0.1.0 – 64bit Production

SQL> @oracle_user_setup.sql avdf_user SETUP

Session altered.

Step-14: Adding Secured Target in AV (Secured Target> Target>Register) for Auditing only fillup the Secured Target Locatoin (For Auditiing).

And for Firewall only fillup the Secured Target Locatoin (For Firewall)

Step-15: Add Audit Trail in AV (Secured Target>Audit Trail>Save):

Step-16: Firewall Configuration in Proxy Mode (Management proxy port):

Step-17: Add Enforcement Point IN AV:

How to Create a Physical Standby Database using Backup Pieces without broker

In this article we will learn How to create a new Physical Standby using Backup Set and also DUPLICATE in RMAN, this is a fast way to create Physical Standby when to create the Standby using ACTIVE DATAGUARD is too expensive for our network. In that case a good way is to create the backup in Primary Server and transfer the backup via unattach the mounted disk from the Primary Server and attach it and mount it in the Physical Server and then creating a new and fresh Physical Standby using those Backup Pieces.

For this article I will use two servers:

ababil – Primary Server
dcadg – Physical Standby Server
I am using Oracle Database 12.2.0.1 for this article.

—————————————————————————————————————————————-
Step-01: On primary site
Creating a Backup with RMAN: Let’s start from the beginning, Creating a Backup with RMAN of our production Primary Database which I am suppose it is in Archivelog mode.
—————————————————————————————————————————————–

bash-4.2$ rman

Recovery Manager: Release 12.2.0.1.0 – Production on Wed Feb 13 18:06:48 2019

Copyright (c) 1982, 2017, Oracle and/or its affiliates. All rights reserved.

RMAN> connect target /

connected to target database: ABABIL (DBID=1226709381)

RMAN> backup database format ‘/rmanfs/rmanback/Backup_%U’ include current controlfile;

Starting backup at 13-FEB-19
using target database control file instead of recovery catalog
allocated channel: ORA_DISK_1
channel ORA_DISK_1: SID=1617 device type=DISK
channel ORA_DISK_1: starting full datafile backup set
channel ORA_DISK_1: specifying datafile(s) in backup set
input datafile file number=00005 name=/indexfs1/oradata/ababil/index/ababil_index_ts01.dbf
input datafile file number=00007 name=/databasefs1/oradata/ababil/data/ababil_ts01.dbf
input datafile file number=00008 name=/databasefs1/oradata/ababil/data/ababil_ts02.dbf
input datafile file number=00009 name=/databasefs2/oradata/ababil/data/ababil_ts03.dbf
input datafile file number=00012 name=/databasefs3/oradata/ababil/data/ababil_ts04.dbf
input datafile file number=00018 name=/databasefs5/oradata/ababil/data/ababil_ts07.dbf
input datafile file number=00013 name=/databasefs3/oradata/ababil/data/ababil_ts05.dbf
input datafile file number=00016 name=/databasefs4/oradata/ababil/data/ababil_ts06.dbf
input datafile file number=00017 name=/indexfs3/oradata/ababil/index/ababil_index_ts03.dbf
input datafile file number=00011 name=/indexfs2/oradata/ababil/index/ababil_index_ts02.dbf
input datafile file number=00014 name=/databasefs5/oradata/ababil/data/agent_ts01.dbf
input datafile file number=00006 name=/imagefs/oradata/ababil/data/ababil_image_ts01.dbf
input datafile file number=00010 name=/auditfs/ababil/auditts01.dbf
input datafile file number=00003 name=/undofs/oradata/ababil/undo/ababil_undo_tbs01.dbf
input datafile file number=00015 name=/indexfs4/oradata/ababil/index/agent_index_ts01.dbf
input datafile file number=00019 name=/indexfs4/oradata/ababil/index/ababil_index_ts04.dbf
input datafile file number=00002 name=/dbsystemfs/oradata/ababil/sysaux01.dbf
input datafile file number=00001 name=/dbsystemfs/oradata/ababil/system01.dbf
input datafile file number=00004 name=/dbsystemfs/oradata/ababil/users/users01.dbf
channel ORA_DISK_1: starting piece 1 at 13-FEB-19
channel ORA_DISK_1: finished piece 1 at 13-FEB-19
piece handle=/rmanfs/rmanback/Backup_qptpq0aa_1_1 tag=TAG20190213T180705 comment=NONE
channel ORA_DISK_1: backup set complete, elapsed time: 00:24:45
channel ORA_DISK_1: starting full datafile backup set
channel ORA_DISK_1: specifying datafile(s) in backup set
including current control file in backup set
channel ORA_DISK_1: starting piece 1 at 13-FEB-19
channel ORA_DISK_1: finished piece 1 at 13-FEB-19
piece handle=/rmanfs/rmanback/Backup_qqtpq1on_1_1 tag=TAG20190213T180705 comment=NONE
channel ORA_DISK_1: backup set complete, elapsed time: 00:00:01
Finished backup at 13-FEB-19

Starting Control File and SPFILE Autobackup at 13-FEB-19
piece handle=/archivefs/ABABIL/autobackup/2019_02_13/o1_mf_s_1000146713_g6801b1c_.bkp comment=NONE
Finished Control File and SPFILE Autobackup at 13-FEB-19

—————————————————————————————————————————————
Step-02: Taking Backup of PFILE (PRIMARY DB)
—————————————————————————————————————————————
SQL> create pfile=’/rmanfs/rmanback/pfile.txt’ from spfile;

File created.

—————————————————————————————————————————————-
Step-03: Configuring Oracle Network
Oracle network is very important when we are configuring Standby Databases, since Oracle send redo logs relying on this configurations. We have to set properly all the entries in our tnsnames.ora with both connection descriptions (Primary and Standby)
—————————————————————————————————————————————–

bash-4.2$ cat tnsnames.ora
# tnsnames.ora Network Configuration File: /orafs/app/oracle/12.2.0.1/db_1/network/admin/tnsnames.ora
# Generated by Oracle configuration tools.
LISTENER_ABABIL =
(ADDRESS = (PROTOCOL = TCP)(HOST = x.x.x.x)(PORT = x))

ABABIL =
(DESCRIPTION =
(ADDRESS = (PROTOCOL = TCP)(HOST = x.x.x.x)(PORT = x))
(CONNECT_DATA =
(SERVER = DEDICATED)
(SERVICE_NAME = ababil)
)
)

DCADG =
(DESCRIPTION =
(ADDRESS = (PROTOCOL = TCP)(HOST = x.x.x.x)(PORT = x))
(CONNECT_DATA =
(SERVER = DEDICATED)
(SERVICE_NAME = dcadg)
)
)

bash-4.2$ cat listener.ora
# listener.ora Network Configuration File: /orafs/app/oracle/12.2.0.1/db_1/network/admin/listener.ora
# Generated by Oracle configuration tools.
LISTENER =
(DESCRIPTION =
(DESCRIPTION_LIST =
(ADDRESS = (PROTOCOL = TCP)(HOST = x.x.x.x)(PORT = x))
)
)

SID_LIST_LISTENER =
(SID_LIST =
(SID_DESC =
(GLOBAL_DBNAME = ababil)
(ORACLE_HOME = /orafs/app/oracle/12.2.0.1/db_1)
(SID_NAME = ababil)
)
)

Once we have our tnsnames.ora and listener.ora well configured, we can proceed. Remember to reboot the listener when you perform changes on it.

—————————————————————————————————————————————-
Step-04: Transferring the Backup Pieces to Standby Server
And now the last step in the Primary Server, transferring the backup pieces to the Standby Server. I am using scp for this example, however as I said, if you have any other storage solutions to transfer all these files you can use it.
—————————————————————————————————————————————–
[oracle@ababil data]$ scp Backup_i* oracle@dcadg:/data
Are you sure you want to continue connecting (yes/no)? yes
Warning: Permanently added ‘x.x.x.x’ (RSA) to the list of known hosts.
oracle@x.x.x.x’s password:
Backup_i1rgqbnr_1_1 100% 1205MB 33.5MB/s 00:36
Backup_i2rgqboa_1_1 100% 14MB 13.6MB/s 00:01

—————————————————————————————————————————————-
Step-05: On Standby site verifying that the Backup Pieces are available in Standby Server
Firstable let’s ensure the Backup Pieces are in the Standby Server with the right permissions and ready to be used.
—————————————————————————————————————————————–

[oracle@dcadg ~]$ ls -ltr /data
total 1696700
drwx—— 2 root root 16384 Jan 7 2016 lost+found
drwxr-xr-x 4 oracle oinstall 4096 May 29 04:07 db1
-rw-r—– 1 oracle oinstall 1263550464 Sep 26 22:36 Backup_i1rgqbnr_1_1
-rw-r—– 1 oracle oinstall 14286848 Sep 26 22:36 Backup_i2rgqboa_1_1
[oracle@dcadg ~]$

—————————————————————————————————————————————-
Step-06: Configuring Oracle Network
We have to configure tnsnames.ora in Standby site as well including connection descriptions for Primary and Standby, since it is the same, I just copied the entries from the tnsnames.ora in the Primary Server, that’s why I am not including again that info.
—————————————————————————————————————————————–

bash-4.2$ cat tnsnames.ora
# tnsnames.ora Network Configuration File: /orafs/app/oracle/12.2.0.1/db_1/network/admin/tnsnames.ora
# Generated by Oracle configuration tools.
LISTENER_DCADG =
(ADDRESS = (PROTOCOL = TCP)(HOST = x.x.x.x)(PORT = x))

DCADG =
(DESCRIPTION =
(ADDRESS = (PROTOCOL = TCP)(HOST = x.x.x.x)(PORT = x))
(CONNECT_DATA =
(SERVER = DEDICATED)
(SERVICE_NAME = dcadg)
)
)

ABABIL =
(DESCRIPTION =
(ADDRESS = (PROTOCOL = TCP)(HOST = x.x.x.x)(PORT = x))
(CONNECT_DATA =
(SERVER = DEDICATED)
(SERVICE_NAME = ababil)
)
)

bash-4.2$ cat listener.ora
# listener.ora Network Configuration File: /orafs/app/oracle/12.2.0.1/db_1/network/admin/listener.ora
# Generated by Oracle configuration tools.
LISTENER =
(DESCRIPTION =
(DESCRIPTION_LIST =
(ADDRESS = (PROTOCOL = TCP)(HOST = x.x.x.x)(PORT = x))
)
)

SID_LIST_LISTENER =
(SID_LIST =
(SID_DESC =
(GLOBAL_DBNAME = dcadg)
(ORACLE_HOME = /orafs/app/oracle/12.2.0.1/db_1)
(SID_NAME = dcadg)
)
)

Once we have our tnsnames.ora and listener.ora well configured, we can proceed. Remember to reboot the listener when you perform changes on it.

—————————————————————————————————————————————-
Step-07: Transferring the Password file from Primary Site
This step is very important, since broker connects to a database that is not open (Physical Standby Database) we have to use password file, this is useful as well when we are doing role operations like Switchover, because Oracle has to connect and start the instance up for the current Physical Standby whenever a switchover is performed.
—————————————————————————————————————————————–
bash-4.2$ echo $ORACLE_HOME
/orafs/app/oracle/12.2.0.1/db_1
[oracle@dcadg ~]$

[oracle@dcadg data]$ scp oracle@ababil:/u01/app/oracle/product/12.1.0/dbhome_1/dbs/orapwdb1$ORACLE_HOME/dbs/orapwdb1s
oracle@db12102’s password:
orapwdb1 100% 7680 7.5KB/s 00:00
[oracle@dcadg data]$

—————————————————————————————————————————————-
Step-08: Transferring the pfile from Primary Site
And now lets bring the pfile we created in the Primary Site in order to use it to start the Standby Instance.
—————————————————————————————————————————————–
Transfering the pfile from Primary Site: And now lets bring the pfile we created in the Primary Site in order to use it to start the Standby Instance.

[oracle@dcadg ~]$ scp oracle@db12102:/data/pfile.txt /u01/app/oracle/product/12.1.0/dbhome_1/dbs/
The authenticity of host ‘db12102 (192.168.56.102)’ can’t be established.
RSA key fingerprint is ef:5b:7b:4f:d1:8d:fd:a4:76:f3:88:4b:d0:8e:41:7b.
Are you sure you want to continue connecting (yes/no)? yes
Warning: Permanently added ‘ababil,x.x.x.x’ (RSA) to the list of known hosts.
oracle@ababil’s password:
pfile.txt 100% 1096 1.1KB/s 00:00
[oracle@dcadg ~]$
This is the time when we modify the parameter db_unique_name with a different name than Primary Instance.

[oracle@dcadg ~]$ cat /u01/app/oracle/product/12.2.0.1/dbhome_1/dbs/pfile.txt|grep name
*.db_name=’db1′
*.db_unique_name=’db1s’
[oracle@dcadg ~]$

—————————————————————————————————————————————-
Step-09: Drop Redo Group(Primary DB)
—————————————————————————————————————————————–

ALTER DATABASE DROP STANDBY LOGFILE GROUP 1;
ALTER DATABASE DROP STANDBY LOGFILE GROUP 2;
ALTER DATABASE DROP STANDBY LOGFILE GROUP 3;
ALTER DATABASE DROP STANDBY LOGFILE GROUP 4;
ALTER DATABASE DROP STANDBY LOGFILE GROUP 5;
ALTER DATABASE DROP STANDBY LOGFILE GROUP 6;
ALTER DATABASE DROP STANDBY LOGFILE GROUP 7;
ALTER DATABASE DROP STANDBY LOGFILE GROUP 8;
ALTER DATABASE DROP STANDBY LOGFILE GROUP 9;
ALTER DATABASE DROP STANDBY LOGFILE GROUP 10;
ALTER DATABASE DROP STANDBY LOGFILE GROUP 11;
ALTER DATABASE DROP STANDBY LOGFILE GROUP 12;
ALTER DATABASE DROP STANDBY LOGFILE GROUP 13;

—————————————————————————————————————————————-
Step-10: REDO GROUP WITH MEMBER CREATION FOR ADG (PRIMARY DB)
—————————————————————————————————————————————–

ALTER DATABASE ADD STANDBY LOGFILE THREAD 1 GROUP 7
(‘/redo_controlfs1/oradata/standby/redo/standby_redo7.log’) SIZE 500M;

ALTER DATABASE ADD STANDBY LOGFILE THREAD 1 GROUP 8
(‘/redo_controlfs2/oradata/standby/redo/standby_redo8.log’) SIZE 500M;

ALTER DATABASE ADD STANDBY LOGFILE THREAD 1 GROUP 9
(‘/redo_controlfs3/oradata/standby/redo/standby_redo9.log’) SIZE 500M;

ALTER DATABASE ADD STANDBY LOGFILE THREAD 1 GROUP 10
(‘/redo_controlfs1/oradata/standby/redo/standby_redo10.log’) SIZE 500M;

ALTER DATABASE ADD STANDBY LOGFILE THREAD 1 GROUP 11
(‘/redo_controlfs2/oradata/standby/redo/standby_redo11.log’) SIZE 500M;

ALTER DATABASE ADD STANDBY LOGFILE THREAD 1 GROUP 12
(‘/redo_controlfs3/oradata/standby/redo/standby_redo12.log’) SIZE 500M;

ALTER DATABASE ADD STANDBY LOGFILE THREAD 1 GROUP 13
(‘/redo_controlfs1/oradata/standby/redo/standby_redo13.log’) SIZE 500M;

—————————————————————————————————————————————-
Step-11: LOG_ARCHIVE_DEST SETUP (PRIMARY DB)
—————————————————————————————————————————————-

alter system set log_archive_config=’dg_config=(ababil,adgndc,dcadg)’;

alter system set log_archive_dest_3=’service=dcadg async valid_for=(online_logfiles,primary_role) db_unique_name=dcadg’;

—————————————————————————————————————————————-
Step-12: DIRECTORY CREATION (ON STANDBY)
—————————————————————————————————————————————-
mkdir -p /orafs/fast_recovery_area
mkdir -p /orafs/flash_recovery_area
mkdir -p /orafs/admin/ababil/adump
mkdir -p /orafs/admin/ababil/dpdump
mkdir -p /orafs/admin/ababil/pfile
mkdir -p /redo_controlfs1/ababil/redo
mkdir -p /redo_controlfs2/ababil/redo
mkdir -p /redo_controlfs3/ababil/redo
mkdir -p /undofs/oradata/ababil/undo
mkdir -p /dbsystemfs/oradata/ababil/users/
mkdir -p /indexfs1/oradata/ababil/index/
mkdir -p /indexfs2/oradata/ababil/index/
mkdir -p /imagefs/oradata/ababil/data/
mkdir -p /databasefs1/oradata/ababil/data/
mkdir -p /databasefs2/oradata/ababil/data/
mkdir -p /databasefs3/oradata/ababil/data/
mkdir -p /databasefs4/oradata/ababil/data/
mkdir -p /databasefs5/oradata/ababil/data/
mkdir -p /auditfs/ababil/
mkdir -p /tempfs/oradata/ababil/temp/
mkdir -p /indexfs3/oradata/ababil/index/
mkdir -p /indexfs4/oradata/ababil/index/
mkdir -p /redo_controlfs1/oradata/ababil/redo/
mkdir -p /redo_controlfs2/oradata/ababil/redo/
mkdir -p /redo_controlfs3/oradata/ababil/redo/
mkdir -p /dbsystemfs/oradata/ababil/
mkdir -p /redo_controlfs1/ababil/control
mkdir -p /redo_controlfs2/ababil/control
mkdir -p /redo_controlfs3/ababil/control

————————————————————————————————————————————–
Step-13: Starting the new instance using the pfile we have modified:
————————————————————————————————————————————–

[oracle@db12102s ~]$ sqlplus / as sysdba
SQL> startup nomount pfile=’/u01/app/oracle/product/12.1.0/dbhome_1/dbs/pfile.txt’;
ORACLE instance started.

Total System Global Area 767557632 bytes
Fixed Size 2929112 bytes
Variable Size 310382120 bytes
Database Buffers 448790528 bytes
Redo Buffers 5455872 bytes
SQL> exit

—————————————————————————————————————————————-
Step-14: RMAN Connect to the Standby DB
—————————————————————————————————————————————-
bash-4.2$ rman target sys/xxx@ababil auxiliary sys/xxx@dcadg

Recovery Manager: Release 12.2.0.1.0 – Production on Wed Aug 14 15:38:54 2019

Copyright (c) 1982, 2017, Oracle and/or its affiliates. All rights reserved.

connected to target database: ABABIL (DBID=1226709381)
connected to auxiliary database: ABABIL (DBID=1226709381)

RMAN>
—————————————————————————————————————————————-
Step-15: Creating the Physical Standby Database using Backup Pieces
And here is where the magic appears, We use DUPLICATE DATABASE but using Backup Pieces, all what we have to specify is where the backup is located and RMAN will do all the work for us. Please note also that we are connecting to the Standby Instance as “auxiliary”. We usually use “target” when we are performing an ACTIVE DUPLICATE which is not the case of this article.
—————————————————————————————————————————————-

run {
allocate channel prmy1 type disk;
allocate channel prmy2 type disk;
allocate channel prmy3 type disk;
allocate channel prmy4 type disk;
allocate channel prmy5 type disk;
allocate channel prmy6 type disk;
allocate channel prmy7 type disk;
allocate channel prmy8 type disk;
allocate channel prmy9 type disk;
allocate channel prmy10 type disk;
allocate auxiliary channel stby type disk;
duplicate target database for standby from active database
spfile
parameter_value_convert ‘ababil’,’dcadg’
set db_name=’ababil’
set db_unique_name=’dcadg’
set db_file_name_convert=’/dbsystemfs/oradata/ababil/’,’/dbsystemfs/oradata/ababil/’,
‘/undofs/oradata/ababil/undo/’,’/undofs/oradata/ababil/undo/’,
‘/dbsystemfs/oradata/ababil/users/’,’/dbsystemfs/oradata/ababil/users/’,
‘/indexfs1/oradata/ababil/index/’,’/indexfs1/oradata/ababil/index/’,
‘/indexfs2/oradata/ababil/index/’,’/indexfs2/oradata/ababil/index/’,
‘/indexfs3/oradata/ababil/index/’,’/indexfs3/oradata/ababil/index/’,
‘/indexfs4/oradata/ababil/index/’,’/indexfs4/oradata/ababil/index/’,
‘/imagefs/oradata/ababil/data/’,’/imagefs/oradata/ababil/data/’,
‘/databasefs1/oradata/ababil/data/’,’/databasefs1/oradata/ababil/data/’,
‘/databasefs2/oradata/ababil/data/’,’/databasefs2/oradata/ababil/data/’,
‘/databasefs3/oradata/ababil/data/’,’/databasefs3/oradata/ababil/data/’,
‘/databasefs4/oradata/ababil/data/’,’/databasefs4/oradata/ababil/data/’,
‘/databasefs5/oradata/ababil/data/’,’/databasefs5/oradata/ababil/data/’,
‘/auditfs/ababil/’,’/auditfs/ababil/’,
‘/tempfs/oradata/ababil/temp/’,’/tempfs/oradata/ababil/temp/’
set log_file_name_convert=’/redo_controlfs1/ababil/redo/’,’/redo_controlfs1/ababil/redo/’
set control_files=’/redo_controlfs1/ababil/control/ababil_control01.ctl’,’/redo_controlfs2/ababil/control/ababil_control02.ctl’,’/redo_controlfs3/ababil/control/ababil_control03.ctl’
set log_archive_max_processes=’5′
set fal_client=’dcadg’
set fal_server=’ababil’
set standby_file_management=’AUTO’
set log_archive_config=’dg_config=(ababil,adgndc,dcadg)’
NOFILENAMECHECK
;
}

————————————————————————————————————————————–
Output
————————————————————————————————————————————–

using target database control file instead of recovery catalog
allocated channel: prmy1
channel prmy1: SID=383 device type=DISK

allocated channel: prmy2
channel prmy2: SID=668 device type=DISK

allocated channel: prmy3
channel prmy3: SID=764 device type=DISK

allocated channel: prmy4
channel prmy4: SID=952 device type=DISK

allocated channel: prmy5
channel prmy5: SID=1143 device type=DISK

allocated channel: prmy6
channel prmy6: SID=1238 device type=DISK

allocated channel: prmy7
channel prmy7: SID=1334 device type=DISK

allocated channel: prmy8
channel prmy8: SID=1429 device type=DISK

allocated channel: prmy9
channel prmy9: SID=1523 device type=DISK

allocated channel: prmy10
channel prmy10: SID=1619 device type=DISK

allocated channel: stby
channel stby: SID=478 device type=DISK

Starting Duplicate Db at 12-MAR-18

contents of Memory Script:
{
backup as copy reuse
targetfile ‘/orafs/app/oracle/12.2.0.1/db_1/dbs/orapwababil’ auxiliary format
‘/orafs/app/oracle/12.2.0.1/db_1/dbs/orapwadgndc’ targetfile
‘/orafs/app/oracle/12.2.0.1/db_1/dbs/spfileababil.ora’ auxiliary format
‘/orafs/app/oracle/12.2.0.1/db_1/dbs/spfileadgndc.ora’ ;
sql clone “alter system set spfile= ”/orafs/app/oracle/12.2.0.1/db_1/dbs/spfileadgndc.ora””;
}
executing Memory Script

Starting backup at 12-MAR-18
Finished backup at 12-MAR-18

sql statement: alter system set spfile= ”/orafs/app/oracle/12.2.0.1/db_1/dbs/spfileadgndc.ora”

contents of Memory Script:
{
sql clone “alter system set dispatchers =
”(PROTOCOL=TCP) (SERVICE=adgndcXDB)” comment=
”” scope=spfile”;
sql clone “alter system set db_name =
”ababil” comment=
”” scope=spfile”;
sql clone “alter system set db_unique_name =
”adgndc” comment=
”” scope=spfile”;
sql clone “alter system set db_file_name_convert =
”/dbsystemfs/oradata/ababil/”, ”/dbsystemfs/oradata/adgndc/”, ”/undofs/oradata/ababil/undo/”, ”/undofs/oradata/adgndc/undo/”, ”/dbsystemfs/oradata/ababil/users/”, ”/dbsystemfs/oradata/adgndc/users/”, ”/indexfs1/oradata/ababil/index/”, ”/indexfs1/oradata/adgndc/index/”, ”/indexfs2/oradata/ababil/index/”, ”/indexfs2/oradata/adgndc/index/”, ”/indexfs3/oradata/ababil/index/”, ”/indexfs3/oradata/adgndc/index/”, ”/indexfs4/oradata/ababil/index/”, ”/indexfs4/oradata/adgndc/index/”, ”/imagefs/oradata/ababil/data/”, ”/imagefs/oradata/adgndc/data/”, ”/databasefs1/oradata/ababil/data/”, ”/databasefs1/oradata/adgndc/data/”, ”/databasefs2/oradata/ababil/data/”, ”/databasefs2/oradata/adgndc/data/”, ”/databasefs3/oradata/ababil/data/”, ”/databasefs3/oradata/adgndc/data/”, ”/databasefs4/oradata/ababil/data/”, ”/databasefs4/oradata/adgndc/data/”, ”/databasefs5/oradata/ababil/data/”, ”/databasefs5/oradata/adgndc/data/”, ”/auditfs/ababil/”, ”/auditfs/adgndc/”, ”/tempfs/oradata/ababil/temp/”, ”/tempfs/oradata/adgndc/temp/” comment=
”” scope=spfile”;
sql clone “alter system set log_file_name_convert =
”/redo_controlfs1/oradata/ababil/redo/”, ”/redo_controlfs1/oradata/adgndc/redo/”, ”/redo_controlfs2/oradata/ababil/redo/”, ”/redo_controlfs2/oradata/adgndc/redo/”, ”/redo_controlfs3/oradata/ababil/redo/”, ”/redo_controlfs3/oradata/adgndc/redo/” comment=
”” scope=spfile”;
sql clone “alter system set control_files =
”/redo_controlfs1/adgndc/control/ababil_control01.ctl”, ”/redo_controlfs2/adgndc/control/ababil_control02.ctl”, ”/redo_controlfs3/adgndc/control/ababil_control03.ctl” comment=
”” scope=spfile”;
sql clone “alter system set log_archive_max_processes =
5 comment=
”” scope=spfile”;
sql clone “alter system set fal_client =
”adgndc” comment=
”” scope=spfile”;
sql clone “alter system set fal_server =
”ababil” comment=
”” scope=spfile”;
sql clone “alter system set standby_file_management =
”AUTO” comment=
”” scope=spfile”;
sql clone “alter system set log_archive_config =
”dg_config=(ababil,adgndc)” comment=
”” scope=spfile”;
sql clone “alter system set log_archive_dest_1 =
”location=USE_DB_RECOVERY_FILE_DEST valid_for=(ONLINE_LOGFILE,PRIMARY_ROLE) db_unique_name=adgndc” comment=
”” scope=spfile”;
sql clone “alter system set log_archive_dest_2 =
”service=ababil ASYNC valid_for=(ONLINE_LOGFILE,PRIMARY_ROLE) db_unique_name=ababil” comment=
”” scope=spfile”;
shutdown clone immediate;
startup clone nomount;
}
executing Memory Script

sql statement: alter system set dispatchers = ”(PROTOCOL=TCP) (SERVICE=adgndcXDB)” comment= ”” scope=spfile

sql statement: alter system set db_name = ”ababil” comment= ”” scope=spfile

sql statement: alter system set db_unique_name = ”adgndc” comment= ”” scope=spfile

sql statement: alter system set db_file_name_convert = ”/dbsystemfs/oradata/ababil/”, ”/dbsystemfs/oradata/adgndc/”, ”/undofs/oradata/ababil/undo/”, ”/undofs/oradata/adgndc/undo/”, ”/dbsystemfs/oradata/ababil/users/”, ”/dbsystemfs/oradata/adgndc/users/”, ”/indexfs1/oradata/ababil/index/”, ”/indexfs1/oradata/adgndc/index/”, ”/indexfs2/oradata/ababil/index/”, ”/indexfs2/oradata/adgndc/index/”, ”/indexfs3/oradata/ababil/index/”, ”/indexfs3/oradata/adgndc/index/”, ”/indexfs4/oradata/ababil/index/”, ”/indexfs4/oradata/adgndc/index/”, ”/imagefs/oradata/ababil/data/”, ”/imagefs/oradata/adgndc/data/”, ”/databasefs1/oradata/ababil/data/”, ”/databasefs1/oradata/adgndc/data/”, ”/databasefs2/oradata/ababil/data/”, ”/databasefs2/oradata/adgndc/data/”, ”/databasefs3/oradata/ababil/data/”, ”/databasefs3/oradata/adgndc/data/”, ”/databasefs4/oradata/ababil/data/”, ”/databasefs4/oradata/adgndc/data/”, ”/databasefs5/oradata/ababil/data/”, ”/databasefs5/oradata/adgndc/data/”, ”/auditfs/ababil/”, ”/auditfs/adgndc/”, ”/tempfs/oradata/ababil/temp/”, ”/tempfs/oradata/adgndc/temp/” comment= ”” scope=spfile

sql statement: alter system set log_file_name_convert = ”/redo_controlfs1/oradata/ababil/redo/”, ”/redo_controlfs1/oradata/adgndc/redo/”, ”/redo_controlfs2/oradata/ababil/redo/”, ”/redo_controlfs2/oradata/adgndc/redo/”, ”/redo_controlfs3/oradata/ababil/redo/”, ”/redo_controlfs3/oradata/adgndc/redo/” comment= ”” scope=spfile

sql statement: alter system set control_files = ”/redo_controlfs1/adgndc/control/ababil_control01.ctl”, ”/redo_controlfs2/adgndc/control/ababil_control02.ctl”, ”/redo_controlfs3/adgndc/control/ababil_control03.ctl” comment= ”” scope=spfile

sql statement: alter system set log_archive_max_processes = 5 comment= ”” scope=spfile

sql statement: alter system set fal_client = ”adgndc” comment= ”” scope=spfile

sql statement: alter system set fal_server = ”ababil” comment= ”” scope=spfile

sql statement: alter system set standby_file_management = ”AUTO” comment= ”” scope=spfile

sql statement: alter system set log_archive_config = ”dg_config=(ababil,adgndc)” comment= ”” scope=spfile

sql statement: alter system set log_archive_dest_1 = ”location=USE_DB_RECOVERY_FILE_DEST valid_for=(ONLINE_LOGFILE,PRIMARY_ROLE) db_unique_name=adgndc” comment= ”” scope=spfile

sql statement: alter system set log_archive_dest_2 = ”service=ababil ASYNC valid_for=(ONLINE_LOGFILE,PRIMARY_ROLE) db_unique_name=ababil” comment= ”” scope=spfile

Oracle instance shut down

connected to auxiliary database (not started)
Oracle instance started

Total System Global Area 51539607552 bytes

Fixed Size 26423816 bytes
Variable Size 25501371896 bytes
Database Buffers 25904021504 bytes
Redo Buffers 107790336 bytes
allocated channel: stby
channel stby: SID=1427 device type=DISK

contents of Memory Script:
{
backup as copy current controlfile for standby auxiliary format ‘/redo_controlfs1/adgndc/control/ababil_control01.ctl’;
restore clone primary controlfile to ‘/redo_controlfs2/adgndc/control/ababil_control02.ctl’ from
‘/redo_controlfs1/adgndc/control/ababil_control01.ctl’;
restore clone primary controlfile to ‘/redo_controlfs3/adgndc/control/ababil_control03.ctl’ from
‘/redo_controlfs1/adgndc/control/ababil_control01.ctl’;
}
executing Memory Script

Starting backup at 12-MAR-18
channel prmy1: starting datafile copy
copying standby control file
output file name=/orafs/app/oracle/12.2.0.1/db_1/dbs/snapcf_ababil.f tag=TAG20180312T162840
channel prmy1: datafile copy complete, elapsed time: 00:00:01
Finished backup at 12-MAR-18

Starting restore at 12-MAR-18

channel stby: copied control file copy
Finished restore at 12-MAR-18

Starting restore at 12-MAR-18

channel stby: copied control file copy
Finished restore at 12-MAR-18

contents of Memory Script:
{
sql clone ‘alter database mount standby database’;
}
executing Memory Script

sql statement: alter database mount standby database

contents of Memory Script:
{
set newname for tempfile 1 to
“/tempfs/oradata/adgndc/temp/temp01.dbf”;
set newname for tempfile 2 to
“/tempfs/oradata/adgndc/temp/ababil_temp_ts01.dbf”;
switch clone tempfile all;
set newname for datafile 1 to
“/dbsystemfs/oradata/adgndc/system01.dbf”;
set newname for datafile 2 to
“/dbsystemfs/oradata/adgndc/sysaux01.dbf”;
set newname for datafile 3 to
“/undofs/oradata/adgndc/undo/ababil_undo_tbs01.dbf”;
set newname for datafile 4 to
“/dbsystemfs/oradata/adgndc/users/users01.dbf”;
set newname for datafile 5 to
“/indexfs1/oradata/adgndc/index/ababil_index_ts01.dbf”;
set newname for datafile 6 to
“/imagefs/oradata/adgndc/data/ababil_image_ts01.dbf”;
set newname for datafile 7 to
“/databasefs1/oradata/adgndc/data/ababil_ts01.dbf”;
set newname for datafile 8 to
“/databasefs1/oradata/adgndc/data/ababil_ts02.dbf”;
set newname for datafile 9 to
“/databasefs2/oradata/adgndc/data/ababil_ts03.dbf”;
set newname for datafile 10 to
“/auditfs/adgndc/auditts01.dbf”;
set newname for datafile 11 to
“/indexfs2/oradata/adgndc/index/ababil_index_ts02.dbf”;
set newname for datafile 12 to
“/databasefs3/oradata/adgndc/data/ababil_ts04.dbf”;
set newname for datafile 13 to
“/databasefs3/oradata/adgndc/data/ababil_ts05.dbf”;
set newname for datafile 14 to
“/databasefs5/oradata/adgndc/data/agent_ts01.dbf”;
set newname for datafile 15 to
“/indexfs4/oradata/adgndc/index/agent_index_ts01.dbf”;
set newname for datafile 16 to
“/databasefs4/oradata/adgndc/data/ababil_ts06.dbf”;
set newname for datafile 17 to
“/indexfs3/oradata/adgndc/index/ababil_index_ts03.dbf”;
backup as copy reuse
datafile 1 auxiliary format
“/dbsystemfs/oradata/adgndc/system01.dbf” datafile
2 auxiliary format
“/dbsystemfs/oradata/adgndc/sysaux01.dbf” datafile
3 auxiliary format
“/undofs/oradata/adgndc/undo/ababil_undo_tbs01.dbf” datafile
4 auxiliary format
“/dbsystemfs/oradata/adgndc/users/users01.dbf” datafile
5 auxiliary format
“/indexfs1/oradata/adgndc/index/ababil_index_ts01.dbf” datafile
6 auxiliary format
“/imagefs/oradata/adgndc/data/ababil_image_ts01.dbf” datafile
7 auxiliary format
“/databasefs1/oradata/adgndc/data/ababil_ts01.dbf” datafile
8 auxiliary format
“/databasefs1/oradata/adgndc/data/ababil_ts02.dbf” datafile
9 auxiliary format
“/databasefs2/oradata/adgndc/data/ababil_ts03.dbf” datafile
10 auxiliary format
“/auditfs/adgndc/auditts01.dbf” datafile
11 auxiliary format
“/indexfs2/oradata/adgndc/index/ababil_index_ts02.dbf” datafile
12 auxiliary format
“/databasefs3/oradata/adgndc/data/ababil_ts04.dbf” datafile
13 auxiliary format
“/databasefs3/oradata/adgndc/data/ababil_ts05.dbf” datafile
14 auxiliary format
“/databasefs5/oradata/adgndc/data/agent_ts01.dbf” datafile
15 auxiliary format
“/indexfs4/oradata/adgndc/index/agent_index_ts01.dbf” datafile
16 auxiliary format
“/databasefs4/oradata/adgndc/data/ababil_ts06.dbf” datafile
17 auxiliary format
“/indexfs3/oradata/adgndc/index/ababil_index_ts03.dbf” ;
sql ‘alter system archive log current’;
}
executing Memory Script

executing command: SET NEWNAME

executing command: SET NEWNAME

renamed tempfile 1 to /tempfs/oradata/adgndc/temp/temp01.dbf in control file
renamed tempfile 2 to /tempfs/oradata/adgndc/temp/ababil_temp_ts01.dbf in control file

executing command: SET NEWNAME

executing command: SET NEWNAME

executing command: SET NEWNAME

executing command: SET NEWNAME

executing command: SET NEWNAME

executing command: SET NEWNAME

executing command: SET NEWNAME

executing command: SET NEWNAME

executing command: SET NEWNAME

executing command: SET NEWNAME

executing command: SET NEWNAME

executing command: SET NEWNAME

executing command: SET NEWNAME

executing command: SET NEWNAME

executing command: SET NEWNAME

executing command: SET NEWNAME

executing command: SET NEWNAME

Starting backup at 12-MAR-18
channel prmy1: starting datafile copy
input datafile file number=00005 name=/indexfs1/oradata/ababil/index/ababil_index_ts01.dbf
channel prmy2: starting datafile copy
input datafile file number=00007 name=/databasefs1/oradata/ababil/data/ababil_ts01.dbf
channel prmy3: starting datafile copy
input datafile file number=00008 name=/databasefs1/oradata/ababil/data/ababil_ts02.dbf
channel prmy4: starting datafile copy
input datafile file number=00009 name=/databasefs2/oradata/ababil/data/ababil_ts03.dbf
channel prmy5: starting datafile copy
input datafile file number=00012 name=/databasefs3/oradata/ababil/data/ababil_ts04.dbf
channel prmy6: starting datafile copy
input datafile file number=00013 name=/databasefs3/oradata/ababil/data/ababil_ts05.dbf
channel prmy7: starting datafile copy
input datafile file number=00016 name=/databasefs4/oradata/ababil/data/ababil_ts06.dbf
channel prmy8: starting datafile copy
input datafile file number=00011 name=/indexfs2/oradata/ababil/index/ababil_index_ts02.dbf
channel prmy9: starting datafile copy
input datafile file number=00014 name=/databasefs5/oradata/ababil/data/agent_ts01.dbf
channel prmy10: starting datafile copy
input datafile file number=00006 name=/imagefs/oradata/ababil/data/ababil_image_ts01.dbf
output file name=/imagefs/oradata/adgndc/data/ababil_image_ts01.dbf tag=TAG20180312T162849
channel prmy10: datafile copy complete, elapsed time: 00:35:42
channel prmy10: starting datafile copy
input datafile file number=00017 name=/indexfs3/oradata/ababil/index/ababil_index_ts03.dbf
output file name=/databasefs1/oradata/adgndc/data/ababil_ts01.dbf tag=TAG20180312T162849
channel prmy2: datafile copy complete, elapsed time: 00:48:14
channel prmy2: starting datafile copy
input datafile file number=00010 name=/auditfs/ababil/auditts01.dbf
output file name=/databasefs1/oradata/adgndc/data/ababil_ts02.dbf tag=TAG20180312T162849
channel prmy3: datafile copy complete, elapsed time: 00:48:14
channel prmy3: starting datafile copy
input datafile file number=00003 name=/undofs/oradata/ababil/undo/ababil_undo_tbs01.dbf
output file name=/databasefs2/oradata/adgndc/data/ababil_ts03.dbf tag=TAG20180312T162849
channel prmy4: datafile copy complete, elapsed time: 00:48:14
channel prmy4: starting datafile copy
input datafile file number=00015 name=/indexfs4/oradata/ababil/index/agent_index_ts01.dbf
output file name=/databasefs3/oradata/adgndc/data/ababil_ts04.dbf tag=TAG20180312T162849
channel prmy5: datafile copy complete, elapsed time: 00:48:14
channel prmy5: starting datafile copy
input datafile file number=00002 name=/dbsystemfs/oradata/ababil/sysaux01.dbf
output file name=/indexfs2/oradata/adgndc/index/ababil_index_ts02.dbf tag=TAG20180312T162849
channel prmy8: datafile copy complete, elapsed time: 00:48:15
channel prmy8: starting datafile copy
input datafile file number=00001 name=/dbsystemfs/oradata/ababil/system01.dbf
output file name=/databasefs5/oradata/adgndc/data/agent_ts01.dbf tag=TAG20180312T162849
channel prmy9: datafile copy complete, elapsed time: 00:48:15
channel prmy9: starting datafile copy
input datafile file number=00004 name=/dbsystemfs/oradata/ababil/users/users01.dbf
output file name=/databasefs4/oradata/adgndc/data/ababil_ts06.dbf tag=TAG20180312T162849
channel prmy7: datafile copy complete, elapsed time: 00:48:15
output file name=/indexfs1/oradata/adgndc/index/ababil_index_ts01.dbf tag=TAG20180312T162849
channel prmy1: datafile copy complete, elapsed time: 00:48:18
output file name=/databasefs3/oradata/adgndc/data/ababil_ts05.dbf tag=TAG20180312T162849
channel prmy6: datafile copy complete, elapsed time: 00:48:18
output file name=/dbsystemfs/oradata/adgndc/users/users01.dbf tag=TAG20180312T162849
channel prmy9: datafile copy complete, elapsed time: 00:00:36
output file name=/dbsystemfs/oradata/adgndc/system01.dbf tag=TAG20180312T162849
channel prmy8: datafile copy complete, elapsed time: 00:02:56
output file name=/dbsystemfs/oradata/adgndc/sysaux01.dbf tag=TAG20180312T162849
channel prmy5: datafile copy complete, elapsed time: 00:03:06
output file name=/indexfs4/oradata/adgndc/index/agent_index_ts01.dbf tag=TAG20180312T162849
channel prmy4: datafile copy complete, elapsed time: 00:04:07
output file name=/indexfs3/oradata/adgndc/index/ababil_index_ts03.dbf tag=TAG20180312T162849
channel prmy10: datafile copy complete, elapsed time: 00:18:48
output file name=/undofs/oradata/adgndc/undo/ababil_undo_tbs01.dbf tag=TAG20180312T162849
channel prmy3: datafile copy complete, elapsed time: 00:07:07
output file name=/auditfs/adgndc/auditts01.dbf tag=TAG20180312T162849
channel prmy2: datafile copy complete, elapsed time: 00:07:37
Finished backup at 12-MAR-18

sql statement: alter system archive log current

contents of Memory Script:
{
switch clone datafile all;
}
executing Memory Script

datafile 1 switched to datafile copy
input datafile copy RECID=45 STAMP=970593893 file name=/dbsystemfs/oradata/adgndc/system01.dbf
datafile 2 switched to datafile copy
input datafile copy RECID=46 STAMP=970593893 file name=/dbsystemfs/oradata/adgndc/sysaux01.dbf
datafile 3 switched to datafile copy
input datafile copy RECID=47 STAMP=970593893 file name=/undofs/oradata/adgndc/undo/ababil_undo_tbs01.dbf
datafile 4 switched to datafile copy
input datafile copy RECID=48 STAMP=970593893 file name=/dbsystemfs/oradata/adgndc/users/users01.dbf
datafile 5 switched to datafile copy
input datafile copy RECID=49 STAMP=970593893 file name=/indexfs1/oradata/adgndc/index/ababil_index_ts01.dbf
datafile 6 switched to datafile copy
input datafile copy RECID=50 STAMP=970593893 file name=/imagefs/oradata/adgndc/data/ababil_image_ts01.dbf
datafile 7 switched to datafile copy
input datafile copy RECID=51 STAMP=970593893 file name=/databasefs1/oradata/adgndc/data/ababil_ts01.dbf
datafile 8 switched to datafile copy
input datafile copy RECID=52 STAMP=970593893 file name=/databasefs1/oradata/adgndc/data/ababil_ts02.dbf
datafile 9 switched to datafile copy
input datafile copy RECID=53 STAMP=970593893 file name=/databasefs2/oradata/adgndc/data/ababil_ts03.dbf
datafile 10 switched to datafile copy
input datafile copy RECID=54 STAMP=970593893 file name=/auditfs/adgndc/auditts01.dbf
datafile 11 switched to datafile copy
input datafile copy RECID=55 STAMP=970593893 file name=/indexfs2/oradata/adgndc/index/ababil_index_ts02.dbf
datafile 12 switched to datafile copy
input datafile copy RECID=56 STAMP=970593893 file name=/databasefs3/oradata/adgndc/data/ababil_ts04.dbf
datafile 13 switched to datafile copy
input datafile copy RECID=57 STAMP=970593893 file name=/databasefs3/oradata/adgndc/data/ababil_ts05.dbf
datafile 14 switched to datafile copy
input datafile copy RECID=58 STAMP=970593893 file name=/databasefs5/oradata/adgndc/data/agent_ts01.dbf
datafile 15 switched to datafile copy
input datafile copy RECID=59 STAMP=970593893 file name=/indexfs4/oradata/adgndc/index/agent_index_ts01.dbf
datafile 16 switched to datafile copy
input datafile copy RECID=60 STAMP=970593893 file name=/databasefs4/oradata/adgndc/data/ababil_ts06.dbf
datafile 17 switched to datafile copy
input datafile copy RECID=61 STAMP=970593893 file name=/indexfs3/oradata/adgndc/index/ababil_index_ts03.dbf
Finished Duplicate Db at 12-MAR-18
released channel: prmy1
released channel: prmy2
released channel: prmy3
released channel: prmy4
released channel: prmy5
released channel: prmy6
released channel: prmy7
released channel: prmy8
released channel: prmy9
released channel: prmy10
released channel: stby

RMAN>

————————————————————————————————————————————–
Step-16: IMPORTENT NOTE
————————————————————————————————————————————–
01. USE_DB_RECOVERY_FILE_DEST PARAMETER SET IN BOTH SITE AS ‘alter system set log_archive_dest_1=’location=USE_DB_RECOVERY_FILE_DEST’;
02. PRIMAY STANDBY REDOLOG FILES REMOVE AND RECREATE;
03. SECONDARY STANDBY REDOLOG FILES REMOVE AND RECREATE;
04. SET DEST_2 PARAMETER IN STANDBY AS ‘alter system set log_archive_dest_2=’service=ababil async valid_for=(online_logfiles,primary_role) db_unique_name=ababil’;
05. SET FALL_CLIENT AND FALL_SERVER PARAMETER IN STANDBY
06. FOR MRP PROCESS START IN 12C AS ‘ALTER DATABASE RECOVER MANAGED STANDBY DATABASE NODELAY DISCONNECT FROM SESSION;’


EM 11g/12c/13c: emctl start oms Failed with ‘Connection to the repository failed’ and EMGC_OMS1.out Reports ‘ORA-01017: invalid username/password

Casuse: SYSMAN password was changed without following the correct steps. SYSMAN password should not be changed directly in repository database. The ONLY way to change SYSMAN password is using emctl command

Solution:

Note:
– The ‘-use_sys_pwd’ is used to connect to the database as a SYS user and modify the sysman password in the Repository database.
– The current sysman password is not prompted for and only the new password needs to be entered. This will allow the reset of the old password to the new password entered.
– The password will be modified at the Repository Database as well as the WLS Credential store and the monitoring credentials for the ‘OMS and Repository’ target.
– Along with the SYSMAN password, this command will modify the password for the ALL the EM users (SYSMAN_MDS, BIP, SYSMAN_OPSS, SYSMAN_APM, SYSMAN_RO, MGMT_VIEW) created in the Repository Database.

Step-01: Stop OSM
————————————————————————————————————————————–
[oracle@gridcontrol bin]$ ./emctl stop oms
Oracle Enterprise Manager Cloud Control 13c Release 2
Copyright (c) 1996, 2016 Oracle Corporation. All rights reserved.
Stopping Oracle Management Server…
Oracle Management Server Successfully Stopped
Oracle Management Server is Down
JVMD Engine is Down
Step-02: Change password of the SYSMAN user:
[oracle@gridcontrol bin]$ ./emctl config oms -change_repos_pwd -use_sys_pwd -sys_pwd Sys_1234 -new_pwd Sys_1234
Oracle Enterprise Manager Cloud Control 13c Release 2
Copyright (c) 1996, 2016 Oracle Corporation. All rights reserved.
Changing passwords in backend …
Passwords changed in backend successfully.
Updating repository password in Credential Store…
Successfully updated Repository password in Credential Store.
Restart all the OMSs using ’emctl stop oms -all’ and ’emctl start oms’.
Successfully changed repository password.

Step-03: Stop all OMS Services
—————————————————————————————————————————————-
[oracle@gridcontrol bin]$ ./emctl stop oms -all -force
Oracle Enterprise Manager Cloud Control 13c Release 2
Copyright (c) 1996, 2016 Oracle Corporation. All rights reserved.
Stopping Oracle Management Server…
WebTier Successfully Stopped
Oracle Management Server Already Stopped
Oracle Management Server is Down
JVMD Engine is Down
BI Publisher is disabled, to enable BI Publisher on this host, use the ’emctl config oms -enable_bip’ command
Stopping BI Publisher Server…
BI Publisher Server Already Stopped
BI Publisher is disabled, to enable BI Publisher on this host, use the ’emctl config oms -enable_bip’ command
AdminServer Successfully Stopped
BI Publisher Server is Down
BI Publisher is disabled, to enable BI Publisher on this host, use the ’emctl config oms -enable_bip’ command

Step-04: Start OMS
—————————————————————————————————————————————-
[oracle@gridcontrol bin]$ ./emctl start oms


[oracle@gridcontrol bin]$ ./emctl start oms
Oracle Enterprise Manager Cloud Control 13c Release 2
Copyright (c) 1996, 2016 Oracle Corporation. All rights reserved.
Starting Oracle Management Server…
WebTier Successfully Started
Oracle Management Server Successfully Started
Oracle Management Server is Up
JVMD Engine is Up
[oracle@gridcontrol bin]$